Create Your Own Windows 10 Sleep Mode Shortcut
Placing a Windows 10 sleep mode shortcut on your desktop or taskbar can help you to squeeze more battery hours out of your laptop. Or, if you’re working with a desktop computer, you can use it to put the computer in a standby state with one click of your mouse whenever you’re taking a break. Windows 10 sleep mode has the advantage that your computer can resume faster to your last working state when compared to a complete system shutdown.
Update: I've written an updated article on how to create a Windows 11 sleep mode shortcut in case you're on Windows 11.
Indeed, sleep mode will put your computer in an energy-saving state while preserving your current working environment, complete with open documents and active program windows. This allows you to quickly resume where you left off when you “wake up” your computer.
In this article:
- Create a Windows 10 sleep shortcut on your desktop (and taskbar)
- How do I get the sleep button in Windows 10?
- What is the shortcut key for sleep mode in Windows 10
The Windows 10 Sleep Mode Shortcut
Windows 10 already has a sleep mode “icon” on the start menu so you might be wondering why you would need an extra desktop (or taskbar) shortcut. The truth is, you don’t *need* another Windows 10 sleep mode shortcut, but being able to invoke sleep mode with one single click on a taskbar icon that’s always sitting there within reach simply “smoothyfies” the process.
In the image below you can see how you would normally have to click the Windows start button (1), then click the power item (2) and then select “sleep” from the menu (3) in order to make your computer go to sleep. Being able to do the same in one single click is just a tiny bit nicer plus you avoid accidently clicking the wrong menu item (“shutdown” is just right below “sleep” in the start menu) and the frustration that comes with it.
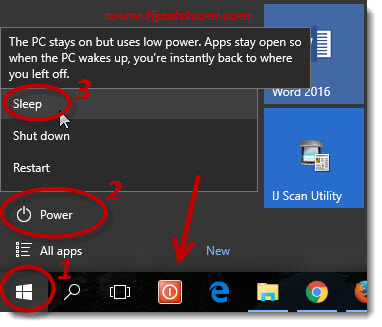
The image also shows my “shutdown” shortcut (indicated with the arrow), which I also always use if I do want a complete shutdown rather than sleep mode. (You can read how to create a shutdown shortcut as well in my Windows shutdown shortcut article in the computer tips and tricks articles.)
Ok so let’s take a look at how you can create your own sleep mode shortcut. To get started, right-click with your mouse on an empty spot on your desktop and select “new” and then “shortcut”.
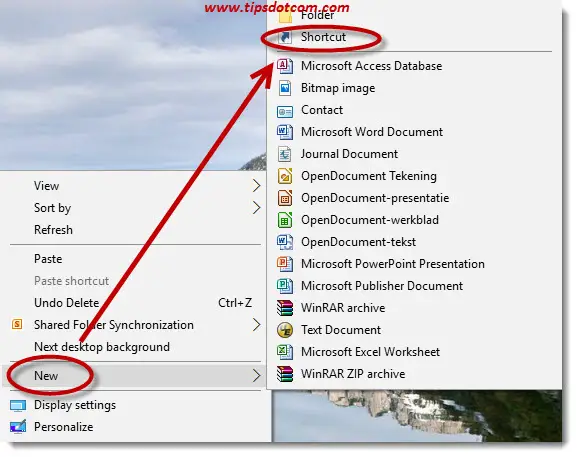
Windows will then come with the “Create shortcut” dialog, in which you enter the following line, exactly as shown in the image (you can copy the text below the image and paste that in your dialog input box).
C:\Windows\System32\rundll32.exe powrprof.dll,SetSuspendState
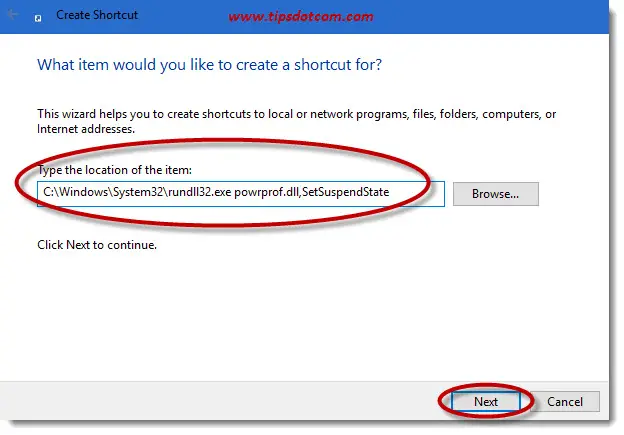
Then click next.
Now Windows will want you to enter a name for the shortcut.
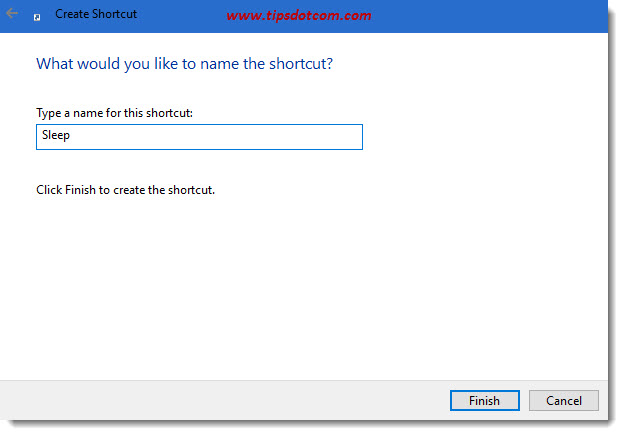
Enter “Sleep” or whatever you feel describes your new shortcut best and click finish.
You’ll now have a new sleep shortcut icon sitting on your desktop, but it might look a bit boring.
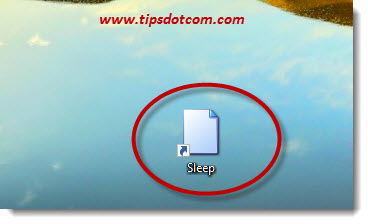
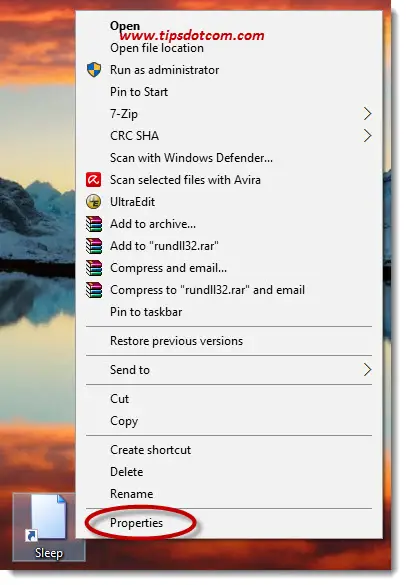
Let’s try and find a more suitable icon for your new Windows 10 sleep mode shortcut. Right-click on the icon and select “Properties” from the menu.
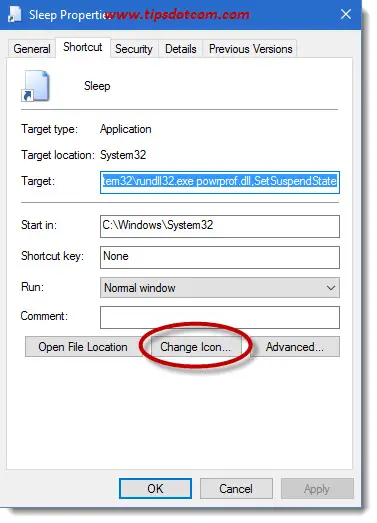
In the properties dialog box of your sleep shortcut, click the “Change icon” button to go to the icon properties.
In the icon properties dialog box, click the browse button to proceed.
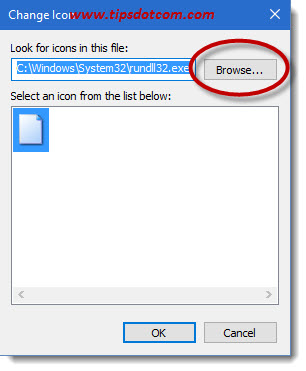
Then, in the “Change icon” open file dialog box, enter the following in the file name field:
%SystemRoot%\system32\shell32.dll
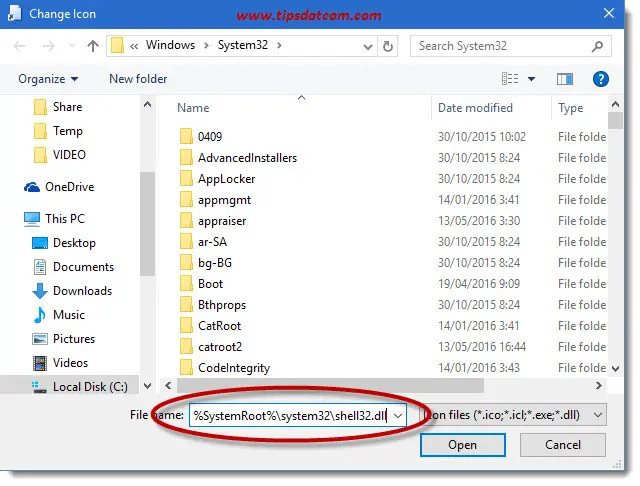
... and click open
Select an icon to represent your Windows 10 sleep mode shortcut from the list and click ok. Click ok a second time to close the icon properties window.
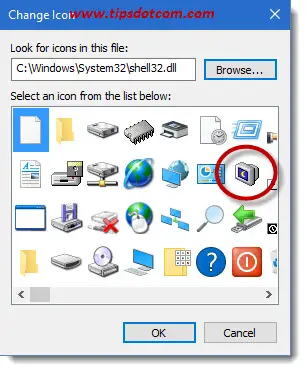
Your icon will now look better than the default, blank new icon image that was originally selected.

You can finish your work by right-clicking your new sleep icon and selecting “Pin to taskbar” from the menu.
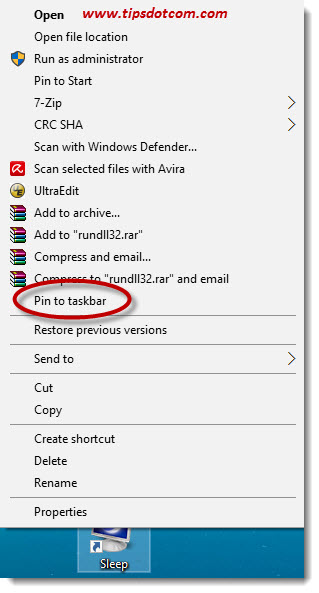
Now you’ll have your own Windows 10 sleep mode shortcut on your taskbar which you can use to put your computer in sleep mode with one click of the mouse.

Computer Hibernating?
Depending on your settings you may find that your sleep mode shortcut causes your computer to go in hibernation mode rather than into sleep mode.
In order to change that behavior, open up an elevated command prompt (click the link if you don’t know how to do open an elevated command prompt) and type the following command in the command prompt:
powercfg -hibernate off
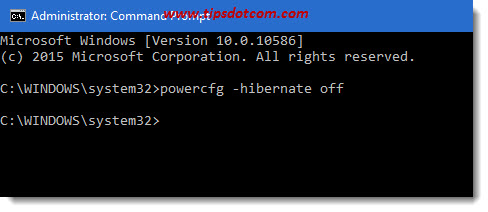
and then press ENTER.
That should do the trick and now your sleep shortcut should work properly!
Edit: I've received a few comments below from people who reported that their shortcut didn't work. There's also an alternate approach with Sysinternal's psshutdown utility that you can try. I've now written a separate Windows 10 sleep shortcut article about that, which you can also check out (also for free, of course).
More Tips on the Windows 10 Shortcut for Sleep
Earlier on I described that the default method to make your Windows 10 computer sleep is to click the start button, then “Power” and then click “Sleep”. But, depending on your settings though, the “Sleep” option is missing on the Windows 10 start menu.
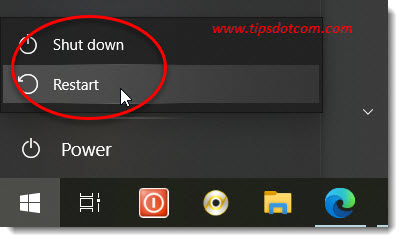
In that case, you will only see “Shutdown” and “Restart” on your Windows 10 start menu.
So let’s see how to enable the sleep button in Windows 10.
How do I get the Sleep Button in Windows 10?
- Go to Windows 10 settings, type “Power & sleep settings” in the “Find a setting” search box and then click “Additional power settings”
- Click “Choose what the power buttons do”
- Click on “Change settings that are currently unavailable”
- Place a checkmark in the box next to “Sleep - Show in power menu”
Let’s go over these steps one by one again with some screenshots.
Go to Windows 10 settings:
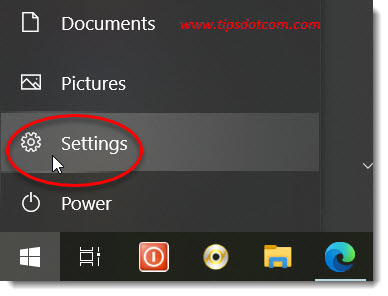
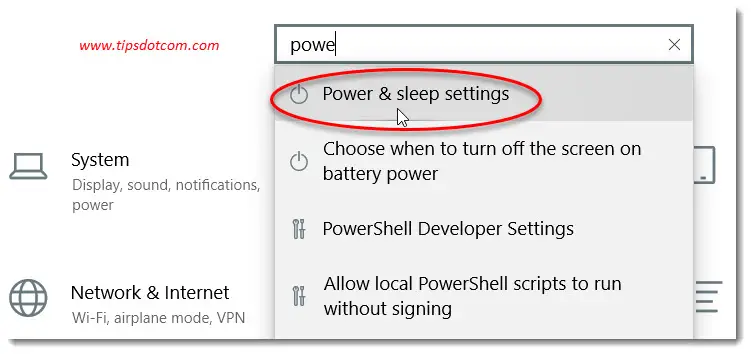
The Windows 10 settings screen will now appear. Start typing “Power & sleep settings” (without the quotes) in the “find a setting” box and select “Power & sleep settings”.
In the power settings window, click the “Additional power settings” link.
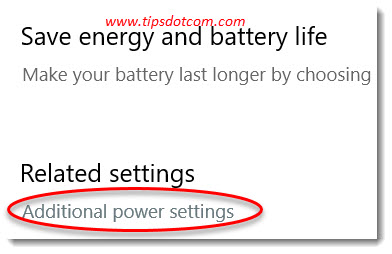
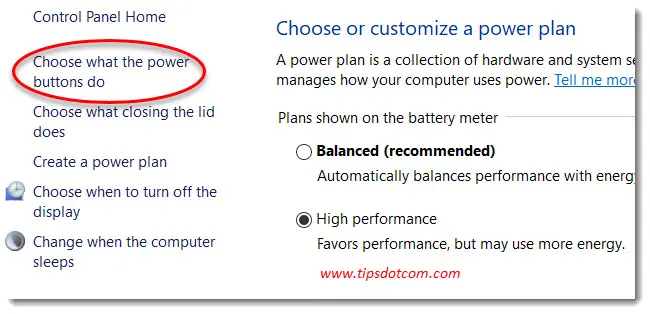
Windows 10 will now show the additional power settings screen. Click the link that says “Choose what the power buttons do” to continue.
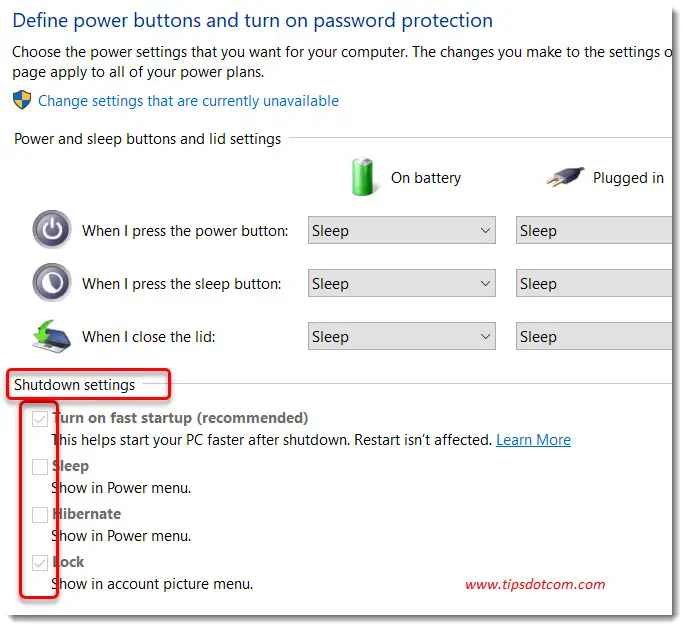
Windows will then display a screen where you can define what happens when you press the power buttons. In the section “Shutdown settings”, you may find that the Windows 10 shutdown settings are greyed out.
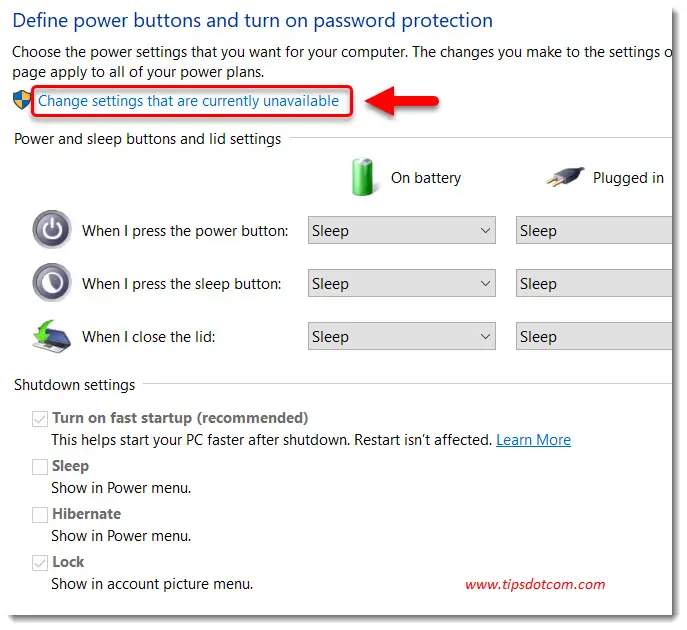
In order to be able to change your Windows 10 shutdown settings, click the link to “Change settings that are currently unavailable”.
Windows will then activate the shutdown settings. Make sure that the checkbox next to “Sleep - Show in power menu” is selected to enable the Windows 10 sleep button in your start menu. Click “Save changes” to confirm your selection.
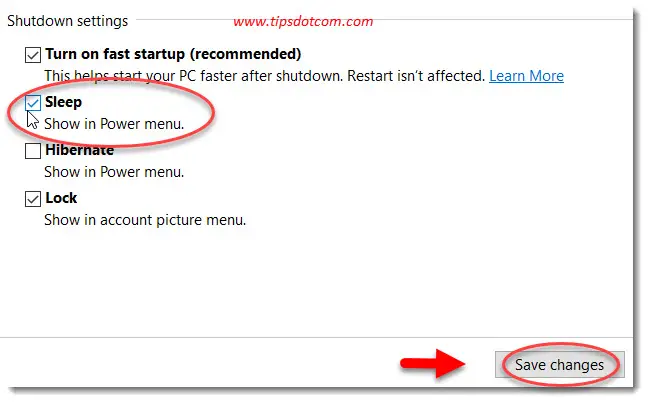
Now, sleep mode will no longer be missing from your Windows 10 power menu.
Time to address a few other Windows 10 sleep mode questions.
What is the Shortcut key for Sleep Mode in Windows 10?
There can be two different interpretations for a sleep keyboard shortcut for Windows 10. One interpretation is where you press a combination of keystrokes on your keyboard to put your computer to sleep and the other is where there is an actual dedicated key on your keyboard for that purpose. Let’s take a look at the former first.
How do I make my computer sleep using the keyboard?
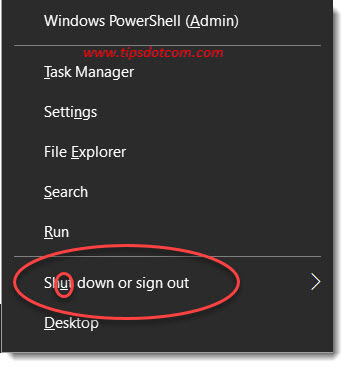
- Press the Windows logo key + x (opens “secret” start menu)
- Press u (to select shutdown or sign out)
- Press s (to select sleep)
With screenshots, this keyboard shortcut for sleep mode would look like this:
Press the Windows logo key + x on your keyboard to open the “secret” start menu.

With the menu open, press u on your keyboard to select the option to “Shut down or sign out”.
Now press s to select the option to sleep.
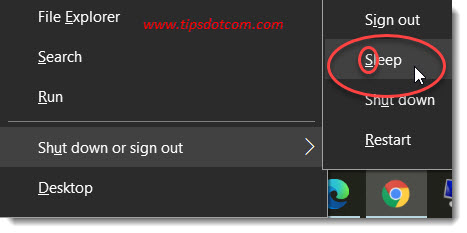
This is your keyboard PC sleep shortcut to enable Windows 10 sleep mode using just your keyboard.
The other option to think about a shortcut for sleep mode is an actual sleep button on your keyboard for Windows 10.
Some portable devices come with this kind of laptop sleep mode shortcut key, which can usually be recognized by a little moon icon. On many laptops you have to press this key in combination with the “Fn” key in order to invoke Windows 10 sleep mode.
If you don’t see any specific sleep mode key on your laptop keyboard, you can always use the power button as a shortcut for sleep mode.
In order to do so, go back to the Windows 10 power settings, to the section “Change what the power buttons do” (as described higher on the page) and select the option “Sleep” next to “When I press the power button”.
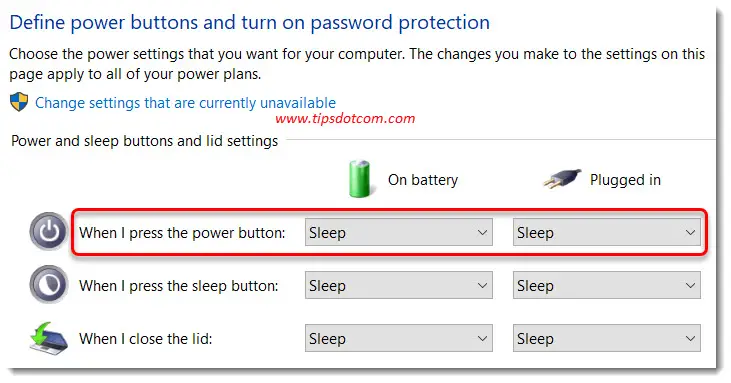
If your laptop has a dedicated sleep button as well, you can also define what to do “When I press the sleep button”.
A Windows 10 sleep mode shortcut key for desktop computers is a slightly different story, because it will totally depend on the keyboard that you hook up to your computer. Some models do have a sleep button on the keyboard and some models even have programmable keys that you can customize to perform certain actions when pressed.
In some cases you may need to install an additional keyboard driver for these functions to work. This will of course depend on the make and model of your keyboard.
But the bottom line is: if you want to be able to invoke Windows 10 sleep mode on your desktop computer from a key on your keyboard, you should look for a keyboard that comes with a dedicated sleep button.
How to Disable Sleep Mode in Windows 10?
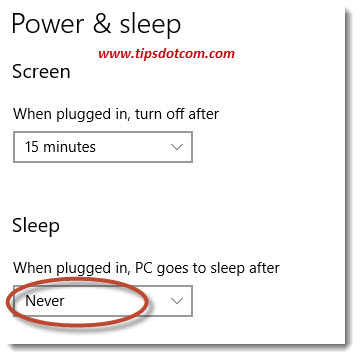
Press the Windows logo key + x on your keyboard and select "settings". Enter "sleep" in the "Find a setting" search box and select "Change when the PC sleeps". Change the setting "Sleep - when plugged in, PC goes to sleep after" to never.
In conclusion we can say that sleep mode in Windows 10 is something that can be looked at from many angles. Configuring sleep mode correctly can enable to to squeeze more hours from your laptop battery or preventing your PC from going to sleep if you leave your desk for a short time. The default sleep behavior that Microsoft sets for Windows 10 may be a good starting point but if they don't exactly match your preference, you can always fine-tune them as per your requirements.
If you enjoyed this article (or my other one), please click the like button below or leave a short comment. I appreciate it, thank you.
If you've enjoyed this article or found it useful, I'd appreciate it if you'd let me know by clicking the Like (or Share) button below. Thank you!


New! Comments
Have your say about what you just read! Leave me a comment in the box below.