Windows 10 Sleep Shortcut
I’ve written about creating a Windows 10 sleep shortcut before. In the comments below that article were a few entries from people who followed the steps but still couldn’t get it to work. So I decided to write about a different approach to do the same thing: get a shortcut on your desktop that you can double-click to put your computer to sleep.
As it turns out, it’s not so obvious to describe a “one size fits all” step-by-step guide to create a Windows 10 sleep shortcut, because there are so many parameters involved. You may be running the same Windows 10 release as the guy next door and still get different results with your sleep shortcut because your computer hardware is slightly different. Putting Windows 10 in sleep mode depends heavily on a number of system devices and even the type of BIOS can make a difference.
So if you’ve tried the steps in my other Windows 10 sleep shortcut article and it didn’t work, please feel free to follow this alternative approach described below.
This method uses one of Microsoft’s Sysinternals utilities called psshutdown, a command line utility originally created to shut down the computer, but with the flexibility to do a lot more (including shutting down remote computers, aborting imminent shutdowns and indeed: putting a Windows 10 sleep shortcut on your desktop).
Windows 10 Sleep Shortcut On Desktop
First you’ll need to download pstools from the Sysinternals website.
Once you’ve downloaded the file, right-click on it and select “Extract All”.

Windows 10 will (by default) suggest extracting the files in a folder called “PSTools” in your download folder, but you can extract the files to any location you like. If you leave the “Show extracted files when complete” box checked, you will automatically land in a File Explorer window in the resulting folder, which is convenient.

Extracting the PSTools files will only take a moment and as I left the above mentioned checkbox checked, this example takes me straight to the designated folder, where the PSTools files are now located.

To continue, scroll to the file called psshutdown, then right-click and select “send to > Desktop (create shortcut)”. That will result in a shortcut to the psshutdown utility on your desktop.

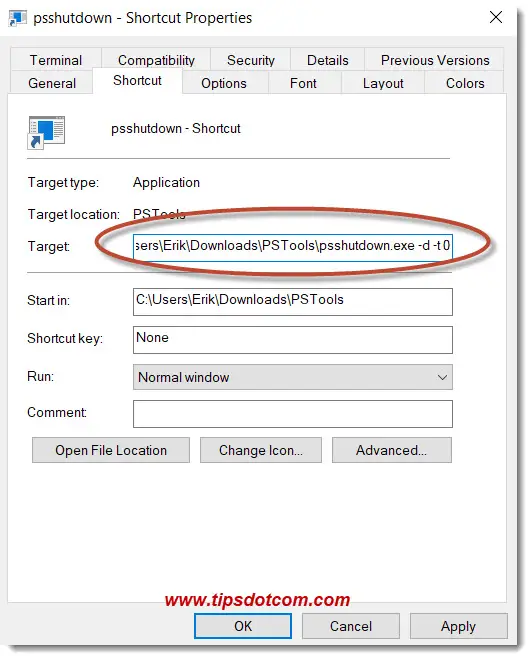
Now we need to make a minor modification to actually make this into a Windows 10 sleep shortcut on your desktop. To do so, right-click the icon and select “properties”.

Then, go to the “Target” field on the shortcut tab in the properties window and add “-d -t 0” (without the quotes and the final character is a zero) at the end of the target.
The entire target would then read something like:
C:\<yourpathtothefile>\psshutdown.exe -d -t 0
Now click ok to close the properties window.
That’s it, your Windows 10 sleep shortcut on your desktop is ready. You can test it by double-clicking the icon to put your computer to sleep.
You might see an end user license agreement screen when you double-click the icon, but that should happen only once. If you accept the end user license agreement, your Windows 10 desktop sleep shortcut should work just fine.
By the way, if you don't like the default icon that appeared on your desktop, please refer to my other sleep shortcut article, which contains steps to select a different icon, like for instance a moon icon or so.
What If Your Windows 10 Desktop Sleep Shortcut Does Not Work?
As mentioned in the introduction, there are quite a few parameters that can differ from one computer to the next and that can disturb the correct behaviour of the sleep shortcut.
On one occasion I had the privilege of dealing with a stubborn Windows 10 sleep shortcut that refused to work because of a faulty system device driver.
I then opened a command prompt, navigated to the folder where the psshutdown utility was located and ran the utility from the command prompt to see whether there were any error messages.
In order to do that, you need to enter psshutdown -d for a sleep command rather than a shutdown (you can get an overview of all possible psshutdown options by typing psshutdown /?).
My psshutdown -d command resulted in a message saying that “The local system does not support suspend”.

Sure enough, when I opened Windows device manager, I found a number of system devices marked with a yellow exclamation point, indicating that there was something wrong with the device driver.

After fixing the issue with the faulty device drivers, the problem was solved and psshutdown -d worked just fine. So always make sure that no system device driver issues are sabotaging your Windows 10 sleep shortcut if it’s not working.
Another way to find out whether or not any system issues exist that are blocking your Windows 10 sleep shortcut is by using the powercfg command.
In order to use that, open an elevated command prompt and enter the following command:
powercfg -energy -output powerreport.html
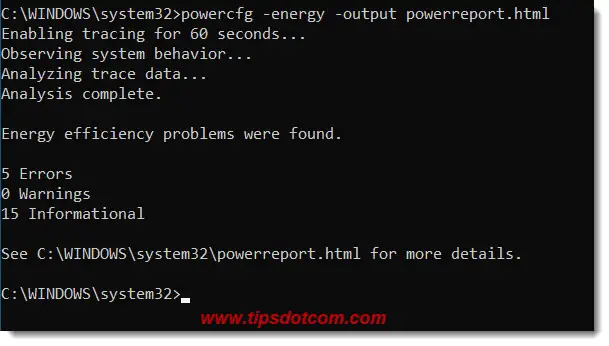
That will make Windows “observe” your computer for about 60 seconds and present a result file called powerreport.html that will potentially point out any misconfigurations of your computer that are crippling your Windows 10 sleep shortcut.
Below is an image that shows an excerpt from such a report file where it is indicated that the “Platform Power Management Capabilities: System Firmware (BIOS) does not support S3 sleep state.

Not being able to get to the S3 level sleep state will not necessarily mean that your computer won’t be able to enter sleep mode, but that’s not the point here.
The point is that the detailed Power Efficiency Diagnostics Report from the powercfg command can put you right on track when troubleshooting your Windows 10 sleep shortcut. Actually in the above mentioned report, there were also errors pointing to an issue with a system device driver, which was solved by installing the correct driver.
As mentioned in the introduction, there are a whole bunch of parameters that can ruin your Windows 10 sleep shortcut and it’s impossible to cover each and every one of them in the scope of this article, but with the aid of Sysinternal’s psshutdown and the powercfg command you should be well-equipped to create a working sleep shortcut on your desktop.
Right-Click Windows Logo
With all the above said, if you still aren't able to get a working Windows 10 shortcut, there is one other alternative that you may want to know about. Many people don't know this, but if you right-click with your mouse on the Windows logo in the bottom-left corner of your screen, there's also an option to "Shut down or sign out" from where you can select "Sleep" to put your computer to sleep.

This is not exactly the same as a desktop shortcut, but it's also a convenient way to put your computer in sleep mode.
If you found this article helpful, please click the like button below or leave a short comment. I really appreciate it, thank you.
If you've enjoyed this article or found it useful, I'd appreciate it if you'd let me know by clicking the Like (or Share) button below. Thank you!
Recent Articles
-
Allow my Organization to Manage my Device - Yay or Nay?
Oct 28, 23 11:30 AM
 Ok to allow my organization to manage my device? Here are my recommendations from an IT pro on how to deal with this. Spoiler alert: most get it wrong.
 -
Destination Path Too Long Error When Copying Files - Solved
Jul 10, 22 12:22 PM
 A destination path too long error when copying files or folders is pretty annoying. Now it doesn't have to be with this proven solution.
 -
Change The RDP Listening Port in Windows - Here's How
Jul 04, 22 08:29 AM
 You can change the RDP listening port in Windows via this setting in the registry. Don't forget to make changes in Windows Defender firewall too.
 -
Share OneDrive Files With External Users - Complete Guide
Jul 01, 22 08:39 AM
 Here's how I share OneDrive files with external users, even if they don't have a Microsoft account. Modern file sharing makes it easy.
 -
Windows 11 File History - Automated Backups
Jun 28, 22 09:44 AM
 Using Windows 11 file history to automatically backup your files. Learn about backup frequency, retention period and common mistakes.
 -
Windows 11 Device Manager - Fixing Devices That Don't Work
Jun 25, 22 12:59 PM
 Using Windows 11 device manager to fix problems with faulty devices. Updating device drivers and manually loading drivers to solve problems.
New! Comments
Have your say about what you just read! Leave me a comment in the box below.