Windows 11 File History - Free Included Backup Program in Windows
Windows 11 file history will inform you that there are no previous versions available if it isn’t turned on. Which it isn’t on a normal Windows 11 computer. Windows 11 does indeed still include the free, automatic backup program called file history, but you need to activate it if you want your files to be protected. In this article I explain how you tell file history to start backing up your files, what you need for it to work properly and mistakes to avoid when using it.
If you’re not familiar with Windows file history, it’s Microsoft’s solution to make backups of your files and it’s included as a part of your Windows operating system. The reason that it’s not turned on by default is because you need an external hard drive for it to be able to make reliable, automatic backups.
Things You’ll Need For File History to Work
File history is easy to turn on, relatively simple to figure out and runs automatically in the background once you activate it. It does however require one thing for it to be able to do its job and that’s a (external) hard drive. This is because it needs the necessary space to store backup copies of your files.
You can also check out my article about what size external hard drive you need to backup your computer if you’re curious.
An external hard drive can be a bit inelegant with mobile devices, which is why Windows 11 file history also offers the option to use a network location to store its backups. Some wifi hard drives come with the option to create a network in your home network or maybe you prefer to use a home cloud solution.
How to Turn on Windows 11 File History
To turn on file history, click the Windows start button, type file history in the search box and select file history under the “best match” search results. A file history control panel window will appear where you can click the “Turn on” button to enable it.
Let’s see what that looks like in a step-by-step fashion.
Click the Windows start button and then click the “type here to search” box to enter your search keywords.

Type “file history” (without the quotes) in the search box and click on the file history best match result to open the file history settings screen.

The Windows 11 file history screen will look like this:

As mentioned above, by default Windows 11 file history is off, which will be visible in its status, and you can now click the button “turn on” to activate it.
If Windows finds a drive where it can store backup data, the file history status will change to “on” (if you have several potential storage locations, a dialog box will appear where you can select the destination drive).
File history will immediately start saving copies of your files (this can take a while).

After backing up your files for the first time Windows will only backup the changes made to your files, which takes up significantly less time. It will do this every hour. This means that you will have copies available from your files by the hour and that you can revert to the version of a file from a couple of hours ago. If you’ve been working on a file and you’ve accidentally messed it up, you can revert back to that state it was a specified time ago.
What if I Need to Restore a Much Older Previous Version of my File?
If you need to recover a version of your file(s) that’s a lot older than a few hours, Windows 11 file history has got you covered as well. As long as file history has enough storage space available for your backups, it will keep saved versions of your files forever (that’s the default setting - We’ll see how you can change this behavior in a minute).
How do I Restore Previous Versions of my Files?
To restore previous versions of your files, simply right click on the file, select “Show more options” and then click “Restore previous versions”. Now choose the version you want and click the restore button.
Let’s look at an example. In the image below I have right-clicked a file called myworddocument.docx and I select “More options” from the menu.

Now I can select “Restore previous versions” from the file menu.

This will bring up the Windows 11 file history menu, which looks like this.

Now I can select the previous version I need (in my example there’s only one version) and click the restore button to restore the previous version of my file.
Before your actual restore action, you can also use the “Open” button to take a look at the file first before you restore it. This way you can verify first whether it’s the right version of the document that you’re about to restore.
Because the actual file that I’m trying to restore also still exists, Windows will let me know there’s a conflict and offers me the options to replace the file in the destination, skip this file or compare info for both files.

If you select “Compare info for both files”, you’ll get a file conflict dialog, where you can select both versions so you can decide later on which version you want to keep. The copied version will have a number added to its name.

Once you click continue, your selected file version will be restored.
Restore Personal Files
If you look at the file history window (where you actually turn on file history), you’ll notice that on the left side there are a couple different links that you can click. The first one is “Restore personal files”.
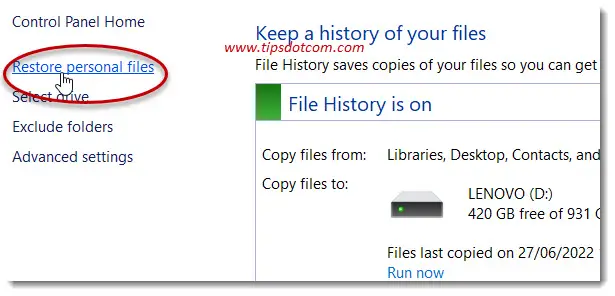
This option allows you to restore multiple files or even entire folders at once. If you click on the link, a new file history window will appear. It will look similar to a normal file explorer window, but it has a few extra features.

At the bottom it has two navigation buttons to browse through older and more recent versions of your files and folders and a green restore button to start a restore operation of what you’re currently looking at.
You can navigate through your file versions, click the folder to look inside and open any of your files to check if they are the version you are looking for.
Whether you are looking at a single file, a group of files or an entire folder, you can always click the green restore button to start restoring any item(s) you’re looking at.
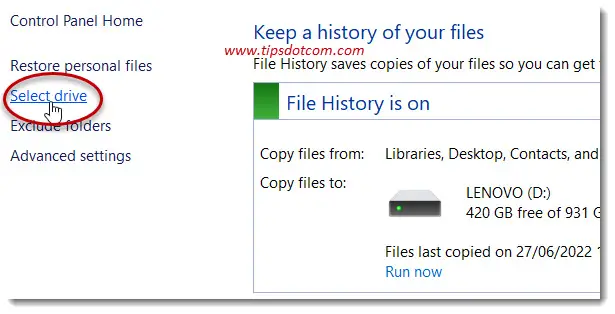
How Can I Change The Windows 11 File History Destination Drive?
You can always change the file history destination drive by clicking the “Select drive” link in the file history main window. Then you can select any drive from the “Available drives” list or add a network location.
How to Free up Space For File History?
To free up space for file history, click “Exclude folders” from the file history main window. Now you get an overview of the folders that are protected by file history. Here you can select folders you don’t need to include in your backup so you can free up storage space. Video files take up a lot of space and can typically be copied to a separate external hard drive so you don’t need them in your file history backup.

How to Change Windows 11 File History Interval Time?
You can change the interval time between backups in file history. If you don’t see the need to have backups every hour, you can change this to a lower frequency by using the advanced settings in the file history control panel.

As you can see in the image below, under the setting “Save copies of files”, you can change the interval time to as frequent as every 10 minutes or use a much longer interval time upwards to a day.

The reason why you would want to use longer intervals is to save on storage space. The more frequently you let Windows make backup copies, the more storage space your backups will use. Even though Windows only makes backups of the changes in your files, these changes can start to add up if you use smaller interval timings. This brings up another important point.
File History Keep Saved Versions
Another configuration option that you will find in the advanced file history settings is “Keep saved versions”. This determines for how long you want file history to keep saved versions of your files before it begins automatically deleting versions that have aged beyond that point. As you can see in the image below, you can use the dropdown list to select a retention period according to your preferences.
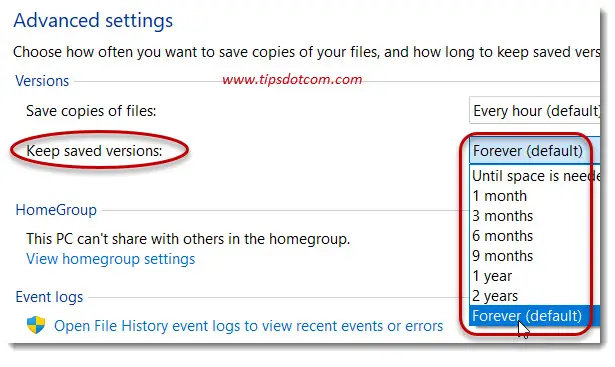
The setting “Until space is needed” lets you tell file history to manage your backup storage automatically and start deleting older versions of your files when it’s running out of space. This can be somewhat tricky though as you can not really know for sure how far back in time you’ll be able to go if you need to restore files to older versions.
The default setting is to keep saved versions of your files forever, which can be a problem if your external hard drive doesn’t have enough capacity to keep older versions of all your files forever. And that brings us to the next topic.
File History Drive is Full
Whenever Windows 11 file history runs out of space and can’t continue to backup your files, you will see a message that the file history drive is full. You can solve this by using the file history cleanup functionality.

Windows 11 file history cleanup will delete older versions of your files and folders. By default it will clean up files and folders that are older than a year, but you can use the dropdown list to select other timeframes for your file history cleanup operation.
Windows 11 File History Error Message: Your File History Drive Was Disconnected For Too Long
Whenever you start seeing messages that your file history drive was disconnected for too long, that means that your external hard drive or the network location haven’t been available for a longer period of time. If you’re working with an external hard drive, file history will manage if you disconnect the hard drive. It will temporarily stop making backup copies of your files. The same is true for network locations. If you are using a laptop or mobile device that connects wirelessly to a network location in your home network, Windows 11 file history will make backup copies of your files at your set interval when you are in range of your network. If you leave your home with your device, it will temporarily stop making backup copies. As soon as you return home and come in reach of your network, it will automatically resume its operations.
But if your backup destination is unreachable for too long, Windows 11 file history will call for your attention and display a message that your file history drive was disconnected for too long. If this happens, simply connect your external hard drive or connect to your network location and it will resume making backup copies.
Speaking of the backup destination: file history saves your backup copies in a folder called FileHistory on the drive you selected as backup drive. This is called the file history location.
Never delete your file history location or any files inside that folder.

Mistakes to Avoid
If you create or use folders in the root directory of your hard drive, you need to pay attention. Windows 11 file history only makes backup copies of the main Windows folders Documents, Music, Pictures, Videos, Desktop, Favorites, Downloads, and a few others.
If you use other folders to store your files you need to be aware that file history will not make backup copies of these folders. You’ll be better off using a third party backup solution.
You wouldn’t be the first to be caught off-guard when trying to revive a file that wasn’t protected by file history just because it wasn’t in one of the main Windows folders.
It’s also worth noting that Microsoft seems to be phasing out Windows 11 file history as they are nudging people towards Microsoft Onedrive, where you can also have backup copies of your files automatically stored. This may not be a great solution for everyone though, as you only get 5GB of storage for free and any upgrade for that would require a paying subscription.
Another point worth mentioning is that Windows 11 file history is activated per user account on your computer. If you have multiple accounts on your computer, file history needs to be enabled for each user account that wants to have backup copies of their files.
With this I hope to have given some guidelines on how to use Windows 11 file history as well as its shortcomings. If you take into consideration what it can do and what it can’t, it can be a good starting point to organize backup copies of your files. If you don’t do anything else, file history will at least have you covered in some of the more common scenarios that can occur when things go wrong.
If you've enjoyed this article or found it useful, I'd appreciate it if you'd let me know by clicking the Like (or Share) button below. Thank you!
Recent Articles
-
Allow my Organization to Manage my Device - Yay or Nay?
Oct 28, 23 11:30 AM
 Ok to allow my organization to manage my device? Here are my recommendations from an IT pro on how to deal with this. Spoiler alert: most get it wrong.
 -
Destination Path Too Long Error When Copying Files - Solved
Jul 10, 22 12:22 PM
 A destination path too long error when copying files or folders is pretty annoying. Now it doesn't have to be with this proven solution.
 -
Change The RDP Listening Port in Windows - Here's How
Jul 04, 22 08:29 AM
 You can change the RDP listening port in Windows via this setting in the registry. Don't forget to make changes in Windows Defender firewall too.
 -
Share OneDrive Files With External Users - Complete Guide
Jul 01, 22 08:39 AM
 Here's how I share OneDrive files with external users, even if they don't have a Microsoft account. Modern file sharing makes it easy.
 -
Windows 11 File History - Automated Backups
Jun 28, 22 09:44 AM
Using Windows 11 file history to automatically backup your files. Learn about backup frequency, retention period and common mistakes. -
Windows 11 Device Manager - Fixing Devices That Don't Work
Jun 25, 22 12:59 PM
 Using Windows 11 device manager to fix problems with faulty devices. Updating device drivers and manually loading drivers to solve problems.
New! Comments
Have your say about what you just read! Leave me a comment in the box below.