The Crashplan Network Drive Backup Guide
This Crashplan network drive backup guide is one of those articles that don’t really “fit in” with the rest of my articles. Normally, I write about more mundane subjects like getting the best free e-mail services or free tools to create pdf documents, but this is one of those times when I just have to write about something slightly out of the average computer user’s experience zone.
Why?
Because every now and then I run into a problem or “challenge” and when I go looking online all I find is other mortals like myself who have encountered the same problem, but no solutions. And when that happens, I make a note to self to create a nice little article with screenshots and all, so that other sorry individuals don’t have to go through the same agony as myself when confronted with the same problem.
This is one of those times.
If you are here because you are curious about Crashplan and what it can do for you, I seriously recommend you take a look at their website (www.code42.com) because Crashplan is a decent piece of backup software that allows you to store your backup copies in the cloud (paid) or even on a friend’s distant computer (free!) or on another computer owned by you.
But there’s a good chance that you are here because you already know Crashplan and now you are trying to make it work to backup a network share with Crashplan. If that’s indeed the case, you also know that backing up a network drive with Crashplan is an unsupported feature. A lot has been written about this and almost anyone who uses Crashplan finds out sooner rather than later that backing up a NAS drive or network drive with Crashplan would really be great, so why is this not supported?
Well, it is indeed not supported, but with “unsupported” settings, it *is* possible to backup a network drive with Crashplan. The problem is that it can be hard to find the exact steps on how to make it work.
Update: My web logs were telling me that people were also starting to find this page when they were searching for a solution for an issue where Crashplan is unable to connect to the backup engine. I have now published a specific article for when you are dealing with the Crashplan cannot connect to the backup engine error.
Crashplan Network Drive Backup Pre-Requirements
The reason why the Crashplan network drive backup doesn’t work out-of-the-box on Windows platforms is that Crashplan runs as a system service and network shares are created with user credentials. This is very subtle, but this is the reason why Crashplan doesn’t “see” network shares or NAS drives.
To further illustrate this, take a look at the image below, where we see the Crashplan service, with “Local System” in the “Log On As” column.

What you need to do in order to grant Crashplan access to the network drive that you want to back up, is to set up the network drive mapping so that “Local System” has access to the network share.
There are several sources on the internet that document how you can create a network mapping by means of a batch file that can be scheduled to run at log on. Now, if you are like me and you are familiar with batch files, you might want to try to create the batch file and run it straight away (as opposed to scheduled during log on). THAT WILL NOT WORK!
You HAVE to create the batch file, save it on your hard drive and use the Windows Task Scheduler to run the task WITH MODIFIED CREDENTIALS (sorry for all the shouting, but this part is really essential and I’ve seen too many people trying to bypass the Task Scheduler part of the workaround and then the trick simply won’t work).
The Crashplan Network Share Workaround Step By Step
So, let’s take for instance this Windows Small Business Server SBS2008 example where I want to use Crashplan to backup a network share.
The image below shows the network drive (z:) that I want to back up with Crashplan.

In Crashplan however, there is no trace of drive z:

To fix that, you need to create a batch file that you will save on the local hard drive of your machine. For instance, in the Crashplan program folder (default C:\Program Files (x86)\CrashPlan), create a batch file cp.bat, like shown in the image below.

As the contents of the batch file, you put one simple command line like this:
net use n: \\devicename\sharename /user:username password
where you replace devicename with the name of the host device that holds the network share; replace sharename with the name of your network share and replace username and password with the credentials that have privileges to read the network share.
The next thing you need to do is to make sure that the batch file you just created is executed with the credentials of “local system”. To accomplish this, you need to use the Windows Task Scheduler. In this example of a Windows 2008 Small Business Server (SBS 2008), this can be done as follows:
Right-click the computer icon and select “Manage” from the context menu.

In the server manager console window that comes up, click “Configuration” and then “Task Scheduler”.

On the right-hand side of the Task Scheduler, click “Create basic task”.

In the Create Basic Task wizard that comes up, enter a name and description for your new task:

In the next (task trigger) step, select “When I log on” and click next.

In the next step, select “Start a program” and click next.
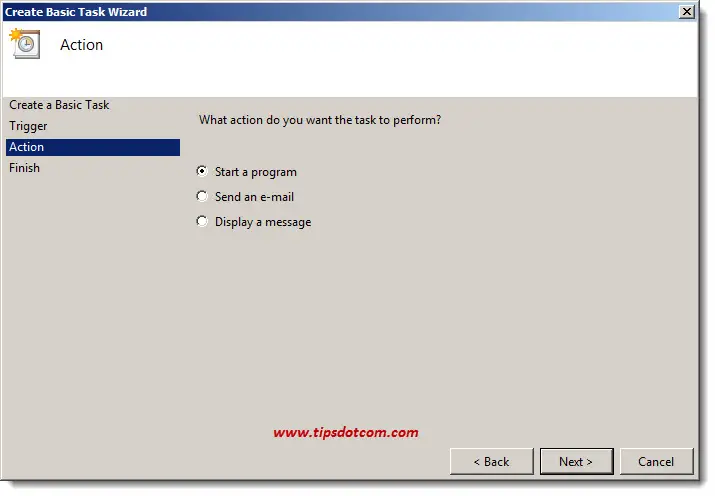
Click browse and go to the location where you saved the batch file for the Crashplan network drive.

Leave the “add arguments” and “Start in” fields empty and click next.
Important: click the “Open the properties dialog for this task when I click finish” checkbox and click next.

In the task properties window, click the “Change User or Group” button.

In the “select user or group” dialog, type “system” and click the “check names” button so that the name system changes to underlined.

Back in the task properties window, make sure that the “Run with highest privileges” check box is checked and click ok.

Now you can close the server manager window and restart your machine to verify that your Crashplan network drive script functioned properly.
Of course, if restarting the server is inconvenient, you can also create a second scheduled task (triggered one time only, a few minutes after you create the task), to get the same result.
Once your script has ran successfully, you will see a disconnected network drive in Windows Explorer. Don’t worry about the “disconnected” status, as this will be fine for the Crashplan network drive workaround.

From that point onwards, you will be able to select the Crashplan network drive in your Crashplan back up application.

My hopes are that with this article I can help fellow Crashplan users who are trying to get the Crashplan network drive workaround to work. If this article was of help to you, please take a moment and leave a comment below, I’d appreciate it, thanks!
If you've enjoyed this article or found it useful, I'd appreciate it if you'd let me know by clicking the Like (or Share) button below. Thank you!
Recent Articles
-
Allow my Organization to Manage my Device - Yay or Nay?
Oct 28, 23 11:30 AM
 Ok to allow my organization to manage my device? Here are my recommendations from an IT pro on how to deal with this. Spoiler alert: most get it wrong.
 -
Destination Path Too Long Error When Copying Files - Solved
Jul 10, 22 12:22 PM
 A destination path too long error when copying files or folders is pretty annoying. Now it doesn't have to be with this proven solution.
 -
Change The RDP Listening Port in Windows - Here's How
Jul 04, 22 08:29 AM
 You can change the RDP listening port in Windows via this setting in the registry. Don't forget to make changes in Windows Defender firewall too.
 -
Share OneDrive Files With External Users - Complete Guide
Jul 01, 22 08:39 AM
 Here's how I share OneDrive files with external users, even if they don't have a Microsoft account. Modern file sharing makes it easy.
 -
Windows 11 File History - Automated Backups
Jun 28, 22 09:44 AM
 Using Windows 11 file history to automatically backup your files. Learn about backup frequency, retention period and common mistakes.
 -
Windows 11 Device Manager - Fixing Devices That Don't Work
Jun 25, 22 12:59 PM
 Using Windows 11 device manager to fix problems with faulty devices. Updating device drivers and manually loading drivers to solve problems.
New! Comments
Have your say about what you just read! Leave me a comment in the box below.