We Couldn’t Complete the Updates
They don’t explain why “we couldn’t complete the updates” do they? At first you may think that the problem will eventually go away on its own, but after so many times you might start wondering whether you should try and get this fixed anyways. If you have decided to give this some attention I have good news for you: below you will find the troubleshooting steps that have helped me fix the problem on multiple occasions.
The problem usually starts when Windows 10 wants to perform an update when you shutdown or start up your computer. You will then see a blue screen with the message that the updates couldn’t be completed.

As you can see in the image above, the entire message reads: “We couldn’t complete the updates. Undoing changes. Don’t turn off your computer”.
That in itself isn’t so bad, because your computer will restart and you will be able to continue to work, but the “we couldn’t complete the updates” message just keeps repeating itself over and over again every time you restart the computer and that will slow down the time it takes to start up your computer. Not to mention the fact that you won’t get any more Windows 10 updates, which can ultimately lead to security issues.
So let’s see what you can do.
We Couldn’t Complete the Updates: How to Fix
The first thing you need to do when you see the “we couldn’t complete the updates” message is check your Windows 10 update troubleshooter.
Wait, what? The Windows 10 troubleshooter is actually useful now?
I know, the Windows troubleshooters are notorious for not being able to troubleshoot anything at all, but trust me on this.
As mentioned before, I was able to clear the “we couldn’t complete the updates” message several times before and the automatic troubleshooter is hands down the easiest way to solve the problem.
Besides, should the troubleshooter NOT fix your problem, then I have some more ideas that you can try further down below so read on. But seriously, using the Windows 10 update troubleshooter isn’t the worst idea. You can at least give it a try.
To run your Windows 10 updates troubleshooter, click the Windows 10 start button and click settings.

Then, in the settings window, click “Update & Security”.

Now click “Troubleshoot” in the left hand side of the screen and click “Windows Update - Resolve problems that prevent you from updating Windows”.

The button “Run the troubleshooter” will now appear so click it to continue.

The troubleshooter will now start to run and attempt to find anything that might be blocking your Windows 10 updates from being installed.
This can take a while so let the troubleshooter run and do its work.

If the troubleshooter finds something, you’ll see the message change from “Detecting problems” to “Resolving problems”, which still is no guarantee that your “we couldn’t complete the updates” message will soon be a thing of the past, but at least there’s hope at this point.

The Windows update troubleshooter may display additional information about the steps that are being taken to fix your problem. For example, one of the times I was able to solve the Windows update problem, I was informed by the troubleshooter that it was stopping the bits system, which was an indication that Windows was dealing with a corrupted update service.
It might take the troubleshooter quite some time to complete all its troubleshooting steps, but if it’s able to finish successfully you will get a screen similar to this:

You can close the troubleshooter and see if that helped fix the “we couldn’t complete the updates” problem. Or you can click the “View detailed information” link at the bottom of the screen.
That will open the troubleshooting report screen, where you can find more details about the issues that were detected (and fixed).

For instance, below is a more detailed screen of one of the issues I was able to fix with the troubleshooter.

There was a problem with BITS service : The requested service has already been started. System.Management.Automation.RemoteException
This just to illustrate that the Windows 10 troubleshooter can sometimes be your best friend when you get the “we couldn't complete the updates” message.
Anyways, at this point you can close the troubleshooter and restart your computer to see if it has solved the problem for you.
We Couldn’t Complete the Updates - More Ideas
In case the Windows 10 troubleshooter wasn’t able to help you fix the problem, here’s something else you can try.
You can try to restart your computer in safe mode and delete the contents of your SoftwareDistribution folder. So let’s start by rebooting your computer in safe mode. To do so, click the Windows start button, then click power and then restart, but do this while holding down the shift key.

If you press and hold the shift key while you click on restart, you will get a screen like this.

Select the option to troubleshoot to continue.
Now you’ll get the next screen, where you select “advanced options”.

Next, select “startup settings”.

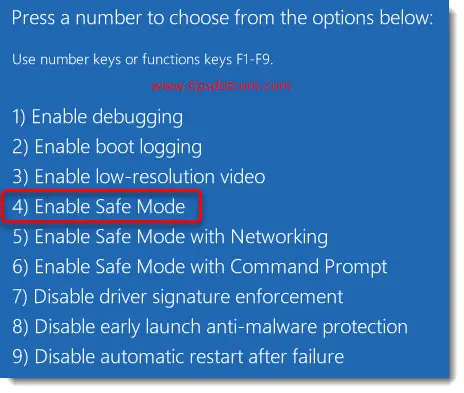
In the next screen Windows 10 will show you the several options you can select from when restarting your computer (including “Enable safe mode”, which is what we’re after).

Click the restart button to proceed.
In the next screen, select the number that corresponds to safe mode to restart Windows 10 in safe mode.
Once started in safe mode, open an elevated command prompt. (If you don’t know how to do that, check my article on opening an elevated command prompt window).
In the elevated command prompt window, type “net stop wuauserv” (without the quotes) to stop the Windows update services and press ENTER.

If Windows replies that the update service is not started (see image below) don’t worry - that’s because you started in safe mode so it’s part of the plan.

Now you are ready to go to the folder C:\Windows\SoftwareDistribution
In this folder, select all files and subfolders and delete everything.

Now you can restart your computer normally and see if the problem is now solved.
With this I hope that you were able to fix the "we couldn't complete the updates" message on your computer. For me, it always feels great to know that someone found help in one of my articles. Even though I won't actually know that it helped you.
Unless of course you would take the time to leave a short comment in the section below, which I would appreciate enormously :-)
You might like these
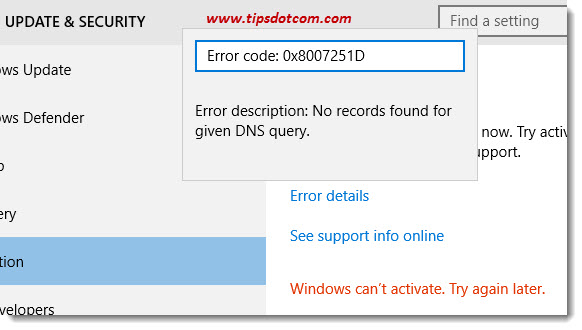
Error Code 0x8007251D - Here's how I solved this.
Fix Error Code 0x8007251D. Error Description: No records found for given DNS query during activation. Here you can read how I was able to solve this.
Destination Path Too Long Error When Copying Files - Solved
A destination path too long error when copying files or folders is pretty annoying. Now it doesn't have to be with this proven solution.
Google Keeps Stopping on Your Phone? Solved.
If Google keeps stopping on your phone, you're on of the millions of people worldwide who is affected. Here's how you can fix it.
Error 1618 Another Installation is in Progress: Solution
I was struggling with error 1618 another installation is in progress but the solution turned out to be quite simple. This is how I fixed it.
SmartScreen Can't be Reached Right Now. Smart Whatnow?
Defender says that SmartScreen can't be reached right now. May very well be true, but how do you fix that? I checked my settings.

If you've enjoyed this article or found it useful, I'd appreciate it if you'd let me know by clicking the Like (or Share) button below. Thank you!
Recent Articles
-
Allow my Organization to Manage my Device - Yay or Nay?
Oct 28, 23 11:30 AM
 Ok to allow my organization to manage my device? Here are my recommendations from an IT pro on how to deal with this. Spoiler alert: most get it wrong.
 -
Destination Path Too Long Error When Copying Files - Solved
Jul 10, 22 12:22 PM
 A destination path too long error when copying files or folders is pretty annoying. Now it doesn't have to be with this proven solution.
 -
Change The RDP Listening Port in Windows - Here's How
Jul 04, 22 08:29 AM
 You can change the RDP listening port in Windows via this setting in the registry. Don't forget to make changes in Windows Defender firewall too.
 -
Share OneDrive Files With External Users - Complete Guide
Jul 01, 22 08:39 AM
 Here's how I share OneDrive files with external users, even if they don't have a Microsoft account. Modern file sharing makes it easy.
 -
Windows 11 File History - Automated Backups
Jun 28, 22 09:44 AM
 Using Windows 11 file history to automatically backup your files. Learn about backup frequency, retention period and common mistakes.
 -
Windows 11 Device Manager - Fixing Devices That Don't Work
Jun 25, 22 12:59 PM
 Using Windows 11 device manager to fix problems with faulty devices. Updating device drivers and manually loading drivers to solve problems.
New! Comments
Have your say about what you just read! Leave me a comment in the box below.