MFP Gmail Settings - Scan to Email With Multifunctional Devices
Countless devices rely on MFP Gmail settings to support “scan to email” functionality. With MFP I am of course referring to Multifunctional printers, which also can scan and sometimes even send faxes. Konica Minolta, Ricoh and HP are some examples of widely used MFP’s that offer these features. These popular office devices are often connected to the company’s LAN network and allow users to send scans directly as an attachment via email.
This is of course very convenient but in order to be able to send scanned documents to an email recipient, the device needs to be configured to talk to an email server of some kind, which then can relay the scanned document and send it off to the email destination.
Amongst the most commonly used popular email servers in this type of devices are of course Google’s Gmail smtp servers and this is where things have changed recently. Google have recently made some changes in the security requirements in their ecosystem, which means that MFP Gmail settings that used to work previously now no longer do.
Whether or not you should be using an external party’s smtp servers to make it possible to send scanned documents directly via email is up for discussion, because you have to take into account that your scanned documents are “leaving” your internal network and are actually trusted to a third party (in this case Google) just to be able to send them to an email recipient. Depending on the confidentiality of your scanned documents, this may be a problem.
For example, a business that is dealing with medical information on patients would probably be better off using their own smtp server in order to keep things in check, but you would be surprised about the kind of organizations that have MFP Gmail settings configured in their devices.
Anyways, whether or not you should configure MFP Gmail settings in your device is subject of a whole separate debate but in any case, devices that are configured to use Gmail smtp settings will start having problems with their scan to email functionality.
Even if it was working fine previously, you will notice that scan to email is not working now, which has to do with the changes in smtp settings in Google.
If you notice that scan to email is not working and you are in the clear with the confidentiality issues mentioned above, you can make the necessary adjustments so that your MFP Gmail settings will start working again.
How to Change MFP Gmail Settings When Scan to Email is Not Working?
In order to get scan to email via Gmail smtp settings working again you need to sign in to the Gmail account and create an app password that you can use in the MFP smtp settings. To be able to create an app password you will need to enable 2 step verification in Gmail.
This may sound like a lot to digest, so let’s break it down in smaller steps.
The first thing you need to do is enable 2 step verification in the Gmail account that you are using to send your scanned documents. I have a separate article that explains in detail how to enable Gmail 2 step verification.
Once you have taken care of that, you can now access the setting in your Gmail account to create an app password. To do that, go to your Google account welcome page (and sign in if you’re not already signed in). You can find the page at https://accounts.google.com
Once you are in, click on “Security” in the left part of the screen.

Then, scroll down a bit in the right hand side of the screen until you see “Signing in to Google”. There you will find “App passwords” (which will only be visible if you have successfully enabled 2 step verification).
Click on “App passwords” to create an app password for use in your MFP device.

Google will ask you to enter your password to verify that it’s you.

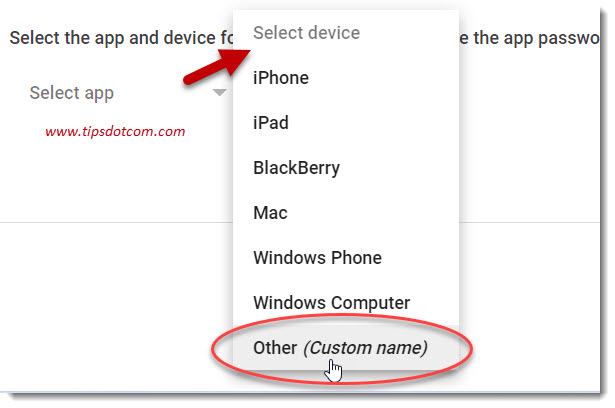
After you’ve typed in your password, you will now see a screen where you can select apps and devices to generate app passwords for.
Click on “Select device” and select “Other (custom name).
Now enter the name of your device (in the example I have entered Konica Minolta c452) and click the generate button.

Google will now generate an app password, specifically for use in your MFP device. Copy the app password and enter it in the MFP Gmail settings of your device.

Make sure to save the new app password in your MFP Gmail settings and you should be all set now.
Congratulations, you have successfully fixed the scan to email functionality via Gmail in your MFP by creating a new app password for your device.
Now you should be able again to scan documents to email directly from your multifunctional device.
I hope this article was helpful and allowed you to successfully change your smtp settings as per the new Google security requirements. If you found it helpful, please consider leaving a short message below.
If you've enjoyed this article or found it useful, I'd appreciate it if you'd let me know by clicking the Like (or Share) button below. Thank you!
Recent Articles
-
Allow my Organization to Manage my Device - Yay or Nay?
Oct 28, 23 11:30 AM
 Ok to allow my organization to manage my device? Here are my recommendations from an IT pro on how to deal with this. Spoiler alert: most get it wrong.
 -
Destination Path Too Long Error When Copying Files - Solved
Jul 10, 22 12:22 PM
 A destination path too long error when copying files or folders is pretty annoying. Now it doesn't have to be with this proven solution.
 -
Change The RDP Listening Port in Windows - Here's How
Jul 04, 22 08:29 AM
 You can change the RDP listening port in Windows via this setting in the registry. Don't forget to make changes in Windows Defender firewall too.
 -
Share OneDrive Files With External Users - Complete Guide
Jul 01, 22 08:39 AM
 Here's how I share OneDrive files with external users, even if they don't have a Microsoft account. Modern file sharing makes it easy.
 -
Windows 11 File History - Automated Backups
Jun 28, 22 09:44 AM
 Using Windows 11 file history to automatically backup your files. Learn about backup frequency, retention period and common mistakes.
 -
Windows 11 Device Manager - Fixing Devices That Don't Work
Jun 25, 22 12:59 PM
 Using Windows 11 device manager to fix problems with faulty devices. Updating device drivers and manually loading drivers to solve problems.
New! Comments
Have your say about what you just read! Leave me a comment in the box below.