Mastering The Windows 8 Start Screen
The Windows 8 start screen looks dramatically different from the Windows Desktop that we know since Microsoft introduced the Desktop with Windows 95 back in 1995.

In this article I’ll show you how easy it is to work with the new Start screen and how you can change it to better fit your needs.
I’ll show you how to
- Change and rearrange the order of the tiles
- Create app groups and organize your apps
- Use semantic zoom to name your app groups
- Use app bars to customize your app tiles and groups
You’ve probably noticed how some of the tiles on your Windows 8 Start screen are constantly shifting and changing. I’ll also show you how to customize these “live” tiles and make your Windows 8 Start screen actually useful.
You’ll see how to
- Enable, disable and customize live tiles
- Change your background image on the Windows 8 lock screen
- Configure your apps to show status updates on the Windows 8 lock screen
Changing Your Tiles In The Windows 8 Start Screen
Windows 8 comes with a number of program or applications (apps) pre-installed on the computer. These apps have a tile on your Windows 8 Start screen. Also the apps that you install later on (like for instance Microsoft Office), can get their own tile on the start screen. This depends on the app’s installation procedure.
Note: There are also apps on your computer that *don’t* have their tile on the Windows 8 start screen. I’ll show you how to change the apps on your start screen further on.
By default, the mail app is the one in the top left corner of your start screen, as you can see in the image higher on this page. If you want to use another mail program or you want to put another app in its place, you can move the mail app to a less prominent location.
Click and hold the mail app tile with your mouse (or with your finger if you’re on a touch screen) and simply drag the tile to another location. As soon as you start moving the tile, you’ll notice that the other tiles will automatically move out of the way.

You might have noticed something else too: if you move the mail app far enough to the right, an app group separator will temporarily show up as you move into another app group.

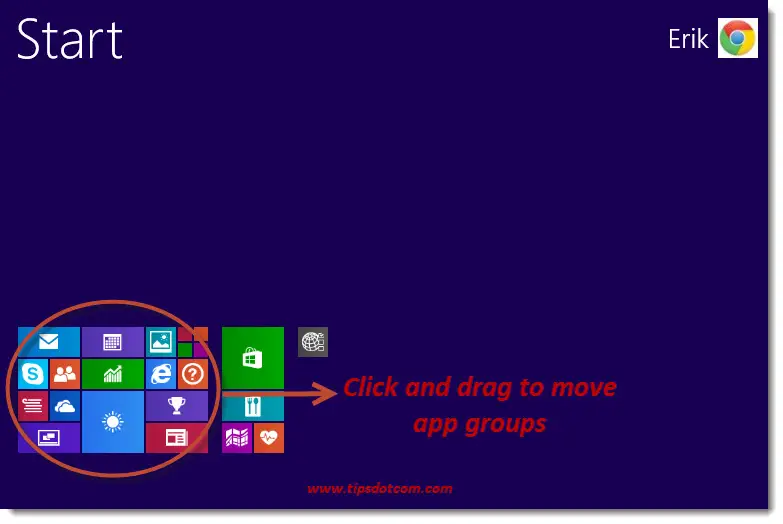
Indeed: your apps are organized in groups, which are visualized by a little extra space between the apps on the Windows 8 start screen.
Creating New App Groups
To create a new app group, click and hold a tile and drag it all the way to the left (or to the right) of your start screen. A new app group separator will automatically appear, as illustrated in this image:

This way you can play with app groups and start organizing your apps together according to functionality or usefulness. For instance, you can create an app group for Office apps, another group for games and so on. If you install a new app, Windows won’t know in which app group it belongs so it will place the app at the end of your start screen. You must then move the app to the correct app group.
You can also move entire app groups. To do this, you use Windows 8’s semantic zoom function. Press and hold the ctrl-button on your keyboard and use the scroll wheel of your mouse to zoom out and display the apps in a miniature version.

Alternatively, you can also click the minus sign in the bottom right corner of your screen to zoom your start screen.

Or if you’re on a touch screen, use the pinch gesture (place two fingers on the screen and move them together) for semantic zooming.
Once your apps are displayed in a miniature version, you can click any app group and drag it to a new location.
Naming Your App Groups
The app tiles on the start screen always show a small image and the name of the app. Nevertheless, it can sometimes still be confusing what the app actually does. Sometimes it helps to name the group in which the app sits.
To do so, right-click on an empty spot above the app groups and select “name groups”.

A bar with “Name group” will now appear above your app groups. Simply click inside the bar and type the name for your app groups.

As soon as you’re ready with your app group names, click anywhere on an empty spot on your start screen and you’re ready.
Removing Apps From The Start Screen
Some of the apps you might never use, yet they take up space on your start screen. You can easily hide them. Suppose for instance that you never use the weather app. You can remove it by right-clicking and selecting “unpin from start”.

As you can see in the image above, there’s also an option to completely uninstall the app. If you uninstall an app, you can only add it back to the start screen if you re-install the app. If your hard disk has sufficient space, I would recommend that you don’t uninstall the standard Windows apps. That way you can easily add them again to your start screen should you ever need them back.
Adding Tiles To The Start Screen
Apps that you have unpinned from the start screen are no longer visible. However, they still exist on your system.
To put them back on your start screen, click the down-pointing arrow at the bottom of your start screen (if you don’t see the arrow, move your mouse a little bit and it should appear).

Now your apps will appear in an overview on your screen (app view) with a horizontal scroll bar at the bottom to scroll through all the apps on your system.

Right-click on any of the apps and select “pin to start” to put it on your start screen. If you go back to your start screen, you will notice that the app appears all the way on the right. You can click and drag it to any position or group you prefer.

Resizing App Tiles
You may have noticed that the tiles on your start screen have different sizes. In the image below, the mail app is twice the size of the Skype app and the weather app is double the size of the mail app.

To alter the size of an app tile, right-click the tile and select resize. Some apps have fewer different size options than others, this depends on what the makers decided to offer when creating the app.

Quickly Starting Apps
Of course you can also launch apps that are not pinned on your Windows 8 start screen. To do so, you can click the down arrow at the bottom of your start screen to show the overview of all your apps (in app view).
An even quicker way is to simply start typing the first letters of the app you want to start.
Windows will show a list of matching apps and as soon as you have found the app you need, you can simply select it to launch the app.

Live Tiles
You have probably noticed that the contents of some app tiles changes continually. For instance, the money app shows current information about stock market and exchange rates. You can disable or enable live tiles by right-clicking the tile and selecting “Turn live tile off” (or on).

Note: Not all apps offer the live tile functionality. The creator of the app decides whether or not to include this option.
Hiding Personal Data
The Windows 8 start screen shows your app tiles and sometimes status updates or new information. Apps such as the mail app or calendar app can show status information about your latest mail messages or appointments, which can be a privacy issue. To remove your sensitive personal information from the start screen, press the Windows key + i on your keyboard to bring up the display Settings pane for the Start screen.

In the display setting pane, click tiles to go to the tiles settings screen.

Now you can click the “clear” button to remove your personal data from your start screen tiles.

Note: Clearing your personal data from your app tiles is only a temporary solution. After a while you will notice that new information start appearing in your app tiles again. To permanently block personal information from appearing on your start screen, use the option to disable live tiles on the apps that you want to stop showing your personal stuff.
Conclusion: You can modify your Windows 8 start screen according to your personal preferences. Clearly the start screen is not a static proposition, but something in which you can move app tiles around, organize them in groups or change their behavior.
Please take a brief moment and leave a short comment below. I'd appreciate it, thank you!
If you've enjoyed this article or found it useful, I'd appreciate it if you'd let me know by clicking the Like (or Share) button below. Thank you!
Recent Articles
-
Allow my Organization to Manage my Device - Yay or Nay?
Oct 28, 23 11:30 AM
 Ok to allow my organization to manage my device? Here are my recommendations from an IT pro on how to deal with this. Spoiler alert: most get it wrong.
 -
Destination Path Too Long Error When Copying Files - Solved
Jul 10, 22 12:22 PM
 A destination path too long error when copying files or folders is pretty annoying. Now it doesn't have to be with this proven solution.
 -
Change The RDP Listening Port in Windows - Here's How
Jul 04, 22 08:29 AM
 You can change the RDP listening port in Windows via this setting in the registry. Don't forget to make changes in Windows Defender firewall too.
 -
Share OneDrive Files With External Users - Complete Guide
Jul 01, 22 08:39 AM
 Here's how I share OneDrive files with external users, even if they don't have a Microsoft account. Modern file sharing makes it easy.
 -
Windows 11 File History - Automated Backups
Jun 28, 22 09:44 AM
 Using Windows 11 file history to automatically backup your files. Learn about backup frequency, retention period and common mistakes.
 -
Windows 11 Device Manager - Fixing Devices That Don't Work
Jun 25, 22 12:59 PM
 Using Windows 11 device manager to fix problems with faulty devices. Updating device drivers and manually loading drivers to solve problems.
New! Comments
Have your say about what you just read! Leave me a comment in the box below.