Windows 11 Start Menu Pinned Icons
The Windows 11 start menu pinned icons section didn’t exist in Windows 10. There’s actually a lot for choosing the right icons to be pinned so that you can find your favorite programs easier and faster. But have you ever wondered how it got decided which programs made it to the pinned section in your start menu? The answer might surprise you.
The good news is that the Windows 11 start menu is highly customizable and by making a few tweaks you can make it so much better.
It would be my honor to share resources, tricks, tips and hacks — as well as a healthy mindset — that took me so long to acquire and shorten your journey toward enjoying a deeply satisfying Windows 11 start menu AND a well-rounded life.
So let’s get started, shall we?
Uncovering the Secrets of the Windows 11 Start Menu Pinned Icons
The Windows 11 start menu looks quite a bit different from the one in Windows 10. For one thing, Microsoft ditched the live tiles that used to make the start menu look like a dynamic, animated collection of moving parts.
Instead, the Windows 11 start menu looks a bit more static, but by default it contains a section of “pinned apps” and “recommended” icons.
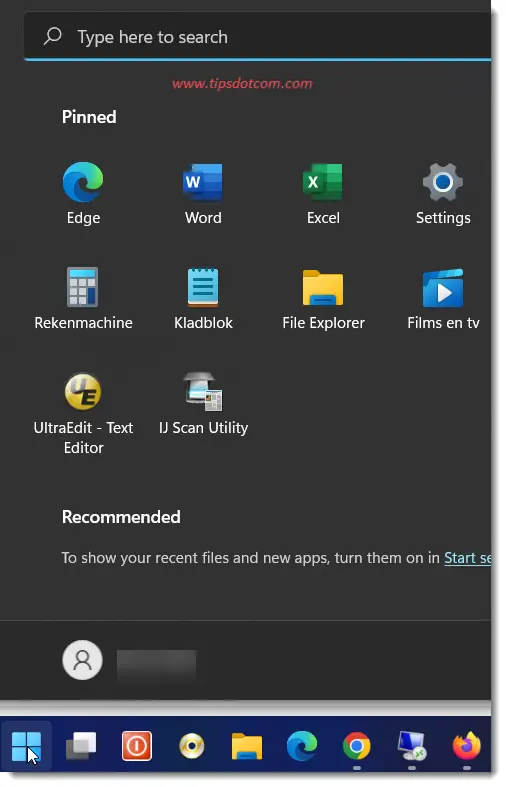
I have a separate article that explains about the recommended icons in detail, including how you can remove recommended icons or hide the recommended section completely from the Windows 11 start menu. Feel free to check that out as well.
Here, we’ll focus on the pinned icons in the Windows 11 start menu and all the things you can do to customize the icons as per your requirements.
The icons that you’ll find under the “pinned” section in your start menu are put there by Windows, based upon what it thinks are programs that you use frequently. Usually that works out ok, but it’s certainly not always the case.
For instance, when I started using a new computer not long ago, the Windows 11 start menu pinned Chrome on the start menu, even though I hadn’t even used Chrome on that computer.
Your start menu will likely be different and may contain apps like Calculator, Alarms and Clock, File Explorer and more. Microsoft typically dumps a bunch of icons under the pinned section in the start menu and many of the apps may not be tailored to your personal interests or work habits. These icons can take up a lot of space on your start menu and can include advertisements or apps that you’ll never use. Let’s see how you can fix that by removing or unpinning icons from your Windows 11 start menu.
How to Remove Windows 11 Start Menu Icons
To remove Windows 11 start menu icons from the start menu, simply right click the icon and select “Unpin from Start”. That’s it, you now have removed or unpinned an app from your start menu. You can repeat this for other apps.
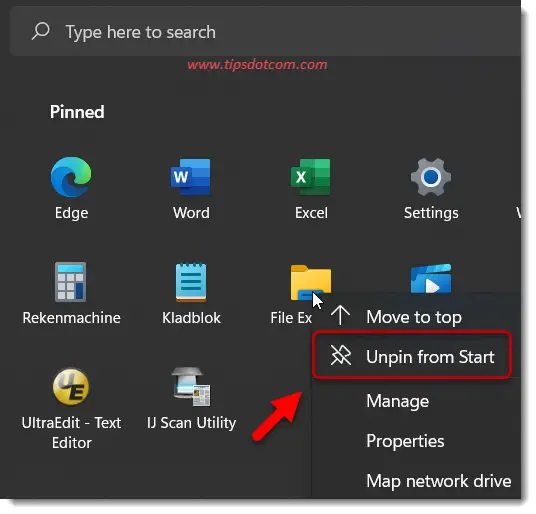
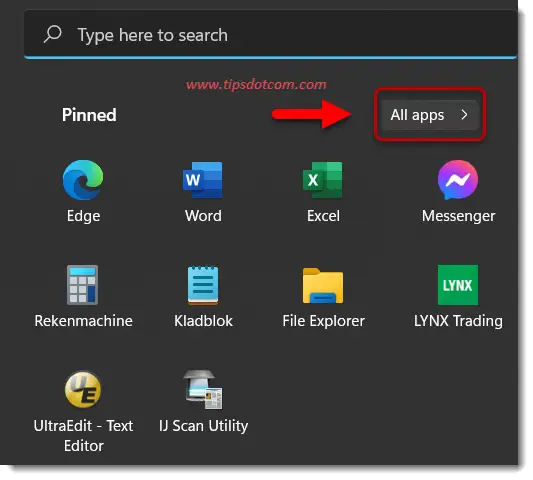
It’s important to note that unpinning apps from your start menu will only remove the app’s icon from the start menu. It will not uninstall the app from your computer, which means you will still be able to use the app should you want to. You’ll still be able to find the app under the “All apps” section in your start menu.
After a couple of rounds of removing or unpinning apps, you’ll now have a lot more free space available on your start menu. Now things may be starting to look more interesting for adding in other apps that you actually want to have quick access to. Which brings us to the next question.
How to Pin a Program to the Windows 11 Start Menu
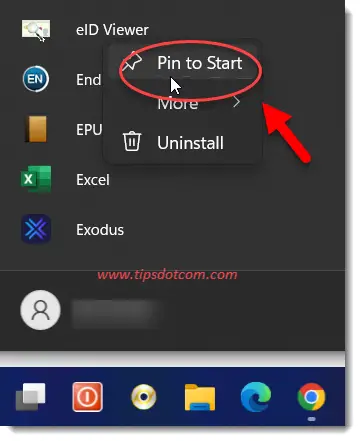
Click “All Apps” in your Windows 11 start menu and navigate to the app you want to pin to your start menu. The apps are listed alphabetically. Once you find the app, right click it and select “Pin to Start”. The app will now be pinned to your start menu.
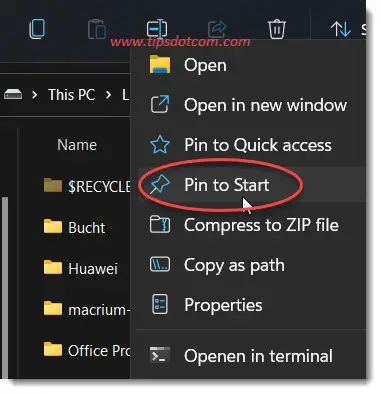
Windows 11 start menu pinned icons aren’t limited to apps. From the desktop, or even in File Explorer, you can right click on items and when the popup menu appears you can select “Pin to Start” to add items to your start menu. These can be files, folders or other items you want to add to the start menu.
Here is an example of a folder in File Explorer being pinned to the Windows 11 start menu.
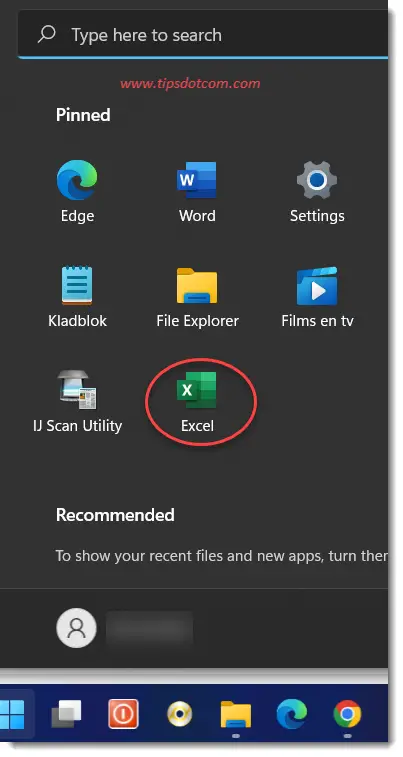
Newly added items appear at the bottom of your start menu. Here’s an example where the Windows 11 start menu pinned Excel at the bottom of the list.
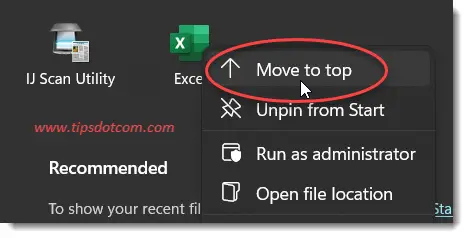
You can move newly added items to the top by right clicking the item. Then, in the popup menu that appears, click “Move to top” to move the icon to the top of the list.
You can also easily customize the order of the Windows 11 start menu pinned icons by clicking and dragging them around.
Now you can start reorganizing your own start menu and add or remove Windows 11 start menu pinned icons. If you’re ready to learn more, you can also check my article about the Windows 11 start menu recommended icons.
I hope this article has helped you figure out the Windows 11 start menu pinned icons a little better. Please consider returning the favor by clicking the like button or leave a short comment below.
Go back to the main Windows 11 Start Menu Survival Guide page.
If you've enjoyed this article or found it useful, I'd appreciate it if you'd let me know by clicking the Like (or Share) button below. Thank you!


New! Comments
Have your say about what you just read! Leave me a comment in the box below.