Windows 10 Play And Explore In Start Menu
Have you noticed the Windows 10 play and explore section in your start menu? Not only play and explore, but also the life at a glance subheading has caused the new Windows 10 start menu to get a lot of heat. People will use it, but many will wish it was different. In this article I’ll show you how easy it is to change your Windows 10 start menu and model it according to your personal preferences.
You can change the wording in the Windows 10 start menu subheadings, move the subheadings around, create new ones or even remove play and explore. Windows 10 start menu options are completely customizable so you can organize your start menu exactly the way you want it.
For reference, the image below shows a “classic” Windows 10 start menu with life at a glance and play and explore subheadings.

It looks as if Microsoft didn’t do a very good job in making the Windows 10 start menu intuitive for the user. They have always encouraged Windows users to right-click on things in order to customize stuff but right-clicking the empty space in your Windows 10 start menu will NOT bring up context menus to rearrange its appearance.
Remove Windows 10 Play And Explore - Start Menu Personalization
The key to start exploring the possibilities for rearranging icons in your Windows 10 start menu is moving around in it with your mouse. As soon as you hover over the Windows 10 play and explore text in your start menu, a subtle change will become visible: you’ll notice two horizontal lines to the right of the Windows 10 play and explore subheading.
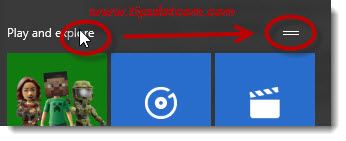
Click the two horizontal lines and the Windows 10 play and explore subheading will change to an input field that you can edit.
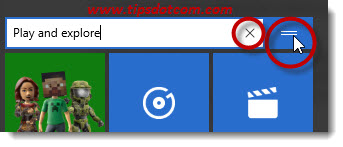
Use the backspace key on your keyboard to erase the characters or type the text you want to appear in the subheading and press ENTER when ready. Alternatively, you can also click the “x” next to the two horizontal lines (see image above) if you want to remove the Windows 10 play and explore subheading.
Feel free to experiment a little bit to hone your Windows 10 start menu remodeling skills, you can’t really break anything.
The horizontal lines in your Windows 10 start menu subheadings are key to changing the text that appears in the subheadings, but what if you want to remove part or all of the apps that appear in the Windows 10 play and explore section?
Removing Apps From Play And Explore (Or Any Other Subheading)
Not too fond of the apps that appear in your play and explore start menu? Getting rid of them is almost even easier than changing your subheadings. Simply right-click the app icon that you want to remove and select “unpin from start” to remove the program from your start menu.
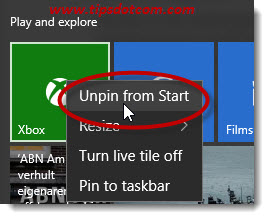
This will not uninstall the program from your computer, it will only remove the program’s icon from your start menu. You’ll still be able to use the program but it won’t be taking up space anymore in your start menu so you’ll have place for other programs that you use more frequently.
Creating Your Own Subheadings In The Windows 10 Start Menu
If you want to create your own subheadings in the Windows 10 start menu to group your applications in a logical order, simply click the icon you want to move and drag it to an empty spot in your start menu.
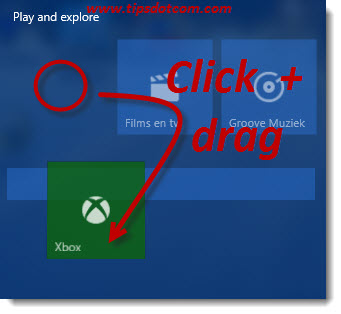
As soon as you drag into an empty area a horizontal bar will appear, indicating the creation of a new subheading in your start menu.
Once the app icon is moved to its new group, a little extra space will be noticeable between it and the group where it used to reside before.
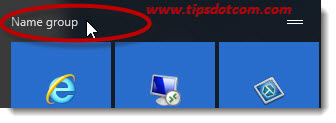
Again, you can put a name on the group in the same way as described earlier in this article: hover your mouse over the space between the groups and “name group” will become visible where you can click to type a name for your app group.
Moving Groups Around
You can also move entire application groups around in your Windows 10 start menu. To do so, simply click the group subheading and drag the group into its new position.
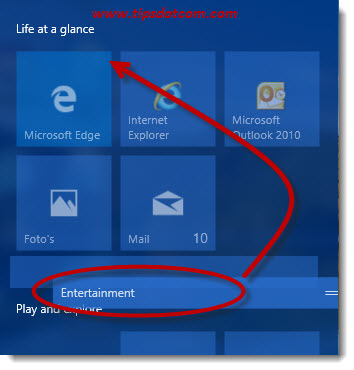
When you have a lot of programs in your start menu, Windows will display a scroll button on the right hand side of the start menu. By moving around application groups in your start menu you can put your most frequently used programs in the top positions so you don’t have to scroll down each time.
Another thing you can do to avoid scrolling in your start menu is making more space available. If you hover over the right hand side edge of your start menu you’ll notice that the mouse pointer changes into a double-sided arrow. That’s when you can click and drag to make your start menu wider (or smaller) to make more (or obviously less) space available for your app icons.
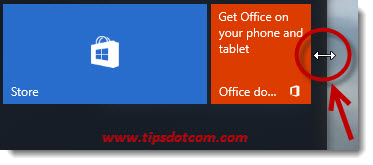
Try experimenting with the top edge of your start menu to change the vertical size of the menu as well.
More Computer Tips And Tricks With The Start Menu
Customizing the Windows 10 play and explore group (or other groups for that matter) isn’t the only thing that you can adapt to your personal preferences. Windows 10 offers a few more options to customize your start menu.
You may have noticed the “most used” section in your Windows 10 start menu.
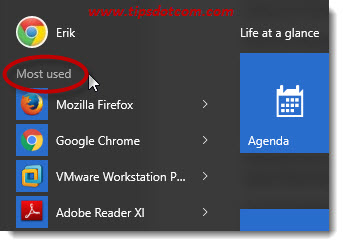
Some people don’t like this dynamically changing list of programs in the start menu. If you don’t want to list your frequently used apps like that in the start menu, press the Windows logo key + “i” on your keyboard to open up the Windows 10 settings screen.
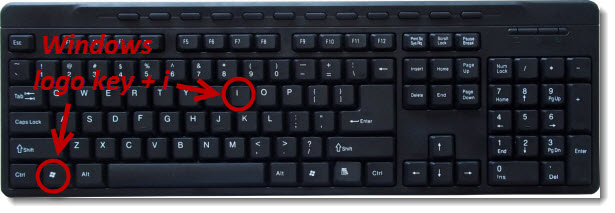
In the settings screen, select the “start” section on the left and then look for the setting “show most used apps” in the right hand part of the screen. Switch the slider to the off position and Windows will no longer show your most used apps in the start menu.
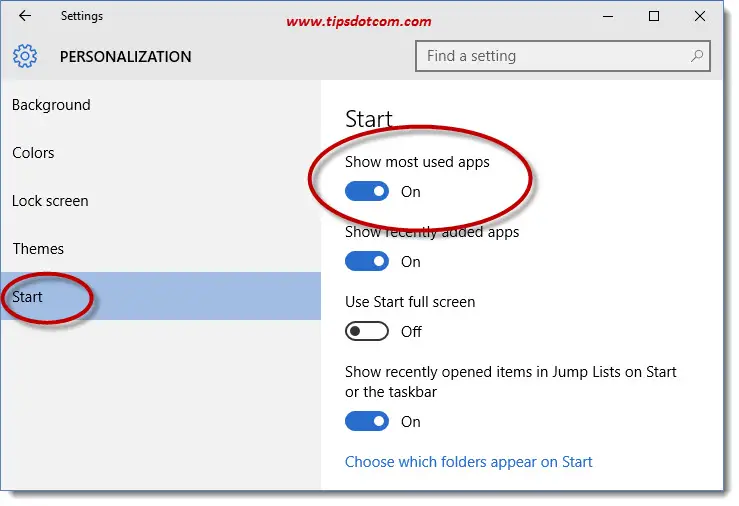
The setting “show recently added apps” will highlight newly installed programs on your start menu so you can easily find them right after they are installed.
The setting to use start full screen will make your start menu appear over the entire screen, pretty much like it used to be in Windows 8.
For the setting with jump lists, please refer to my article about Windows 10 jump lists.
Lastly, for the setting to “choose which folders appear on start”, I also have written a separate article that explains more in-depth what you can do with this setting.
If you’re interested in more news and tips, feel free to sign up for my newsletter. It brings you the latest and greatest tips and advice, it’s completely free and you can find the signup box on my homepage.
I also invite you to leave a short comment in the section below, I’d appreciate it, thanks!
If you've enjoyed this article or found it useful, I'd appreciate it if you'd let me know by clicking the Like (or Share) button below. Thank you!


New! Comments
Have your say about what you just read! Leave me a comment in the box below.