Create a Gmail Account for Your Child
So you have decided to create a Gmail account for your child. Now the only thing standing between you and a child-proof (safe) Gmail account for your kid is a solid plan on how exactly to accomplish that. Some extra guidelines on how to manage Gmail accounts for children to go with that would also come in handy. Well, you can follow my complete, step-by-step tutorials here and by the time you are finished with them you’ll be able to introduce your child to Gmail with confidence (and digital parental consent). After all, you want to be able to guide your child’s experience as they explore online, right?
Ready to learn more? Great! Let’s get started.
Wait, are you really ready? I mean, there are a few sidenotes I need to make before we get started. Strong communication is the foundation of a better experience.
If you believe that it’s a big deal to create a Gmail account for your child, I feel you. Your kid is going to have their first online experience and explore things such as Google services, so you want to be right there to help them along the way and give some guidance.
I’m only saying that because it’s best to take your time and be prepared. If you create a Gmail account for your child in 5 minutes flat and leave the rest to them, you’ll most likely end up disappointed (and so will your child). So please take your time. I have prepared a bunch of material that you can use to prepare yourself and your child, with the best experience possible in mind. On this page (we will start soon, I promise), I explain the steps to create a Gmail account for your child, but when you are done with that, you will want to take a look at some more guides to learn how you can manage your child’s account.
You’ll be able to set things like screen time, locate your child’s devices, keep track of the Google services they use and more. Those settings will be explained in more detail in separate tutorials.
Another thing I want to mention up front is that I will talk about “Google Family Link” to manage your child’s account. Since you’re about to create a Gmail account for your child, Google Family Link is going to be your tool to help your child with their account.
But there’s a small caveat. In order to verify yourself as a parent who will be helping with your child’s Gmail account, Google requires you to enter your credit card information at some point during the setup of your child’s account.
Your credit card won’t be charged and your child will not be able to get access to your credit card without your approval, but you have to enter it. I’m just saying this upfront so if you’re not ready to provide your credit card information to create a Gmail account for your child, then Google Family Link will not work for you.
Still here? Ok, now we’re really ready to get started.
How to Create a Gmail Account for Your Child
To get started to create a Gmail account for your child, make sure to sign in to your own Gmail account first. (Don’t have your own Gmail account? Click here to learn how to create a Gmail account).
From within your own Gmail account, click on your account icon near the top right corner of your screen and click “Add another account”.

Google will now present you with the next screen, where you click “Create account”.

As soon as you click “Create account’, you will have to choose between an account for yourself or to manage a business. Click the “For myself” option (I know, we are here to create a Gmail account for your kid and not for yourself, but bear with me here).

In the next screen enter the name and username for the account (for your child) and choose a secure password.

Next, enter a phone number (optional) and recovery email address (also optional), enter the date of birth of your child and select the gender. If you want to find out why a phone number or recovery email address may be needed, check my article on adding a phone number to your Google account or adding a recovery email address to your Google account). Click next to proceed.

The age of your child is calculated based on the date of birth and if your child is under 13 (or applicable age in your country), Google will prompt “Get help from a parent”. Enter your email address of your own Gmail account here and click next (Because your child is under the age of 13, Google will prompt you to link their email account to your account).

In the next screen, you’ll get a (long) overview of your actions to create a Gmail account for your child (much longer than shown in the image below). You can scan through it and become acquainted with concepts like Family Link and Parental Supervision, your options to set screen time limits on your child’s Android device and much more.

Don’t worry, you don’t have to decide on all this right away, you can scroll through the page, agree to the terms and continue. (You can decide on stuff like screen time and other parental controls later on).

In the next screen you’ll have to enter your password in order to agree to the parental consent and go on to create a Gmail account for your child.

Now you’ll get another overview screen explaining what you can manage in your child’s account as a parent.

Scroll down the page and click next to continue.

Next comes the parental verification page, where Google is asking you to enter your credit card information. It also says that your card won’t be charged and that your child won’t have access to your credit card without your approval.

Enter your credit card information and click accept to continue and create a Gmail account for your child.
In the next screen select “Express personalisation” for now (you can fine tune later) and click next.

The next step is again a long text where you have to scroll all the way down to the bottom to click confirm to confirm that you will manage the data in your child’s account as a parent.

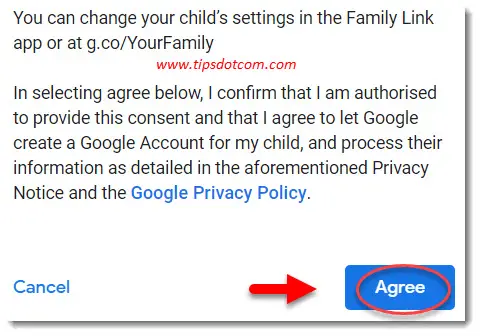
Now there’s one more screen explaining that you can manage the settings for your child’s account in Google Family Link, where you have to click “Agree” at the bottom of the page in order to continue.
After this last step, you’re ready and you’ll see a confirmation screen that you've created a Gmail account for your child. It will also say that you’ll get an email with more information about the account. Click continue to proceed.

You will now land on a screen in the Gmail account of your child. You’ll find a welcome mail in the inbox, explaining that a parent has created a Google account, along with a brief introduction to Google Family Link.
At this point you have successfully created a Gmail account for your child. Next on your to-do list is familiarize yourself with the options and possibilities of Google Family Link so you can set settings for your child like how much time they spend with their devices, keep track of the Google services they use with their account and more.
As mentioned above, I’ll cover that in a separate article (by now you probably already find this page waaayyyyyyy too long).
If you’re not sure how to switch from your child’s newly created Gmail account to your own Gmail account, please refer to login with a different user in Gmail.
If you've enjoyed this article or found it useful, I'd appreciate it if you'd let me know by clicking the Like (or Share) button below. Thank you!
Recent Articles
-
Allow my Organization to Manage my Device - Yay or Nay?
Oct 28, 23 11:30 AM
 Ok to allow my organization to manage my device? Here are my recommendations from an IT pro on how to deal with this. Spoiler alert: most get it wrong.
 -
Destination Path Too Long Error When Copying Files - Solved
Jul 10, 22 12:22 PM
 A destination path too long error when copying files or folders is pretty annoying. Now it doesn't have to be with this proven solution.
 -
Change The RDP Listening Port in Windows - Here's How
Jul 04, 22 08:29 AM
 You can change the RDP listening port in Windows via this setting in the registry. Don't forget to make changes in Windows Defender firewall too.
 -
Share OneDrive Files With External Users - Complete Guide
Jul 01, 22 08:39 AM
 Here's how I share OneDrive files with external users, even if they don't have a Microsoft account. Modern file sharing makes it easy.
 -
Windows 11 File History - Automated Backups
Jun 28, 22 09:44 AM
 Using Windows 11 file history to automatically backup your files. Learn about backup frequency, retention period and common mistakes.
 -
Windows 11 Device Manager - Fixing Devices That Don't Work
Jun 25, 22 12:59 PM
 Using Windows 11 device manager to fix problems with faulty devices. Updating device drivers and manually loading drivers to solve problems.
New! Comments
Have your say about what you just read! Leave me a comment in the box below.