Smtp Gmail Settings For E-mail Clients Or Applications (Or Scanners)
There are several different smtp Gmail settings that you can use, depending on what you need to get done. Many people don’t know that there’s also a way you can use Google’s smtp servers without verification, provided that you only need to send e-mails to Gmail accounts or Google Apps users (Gmail smtp servers won’t let you send to non-Gmail addresses or non-Google Apps accounts without verification but keep reading for instructions to set up verification).
So what good would these Gmail smtp settings without verification be if you can’t use it to send e-mails to any non-Google e-mail account?
To answer that question, I’ll first show you how I set up my automated backup software to shoot me an e-mail to my Gmail account after each backup operation with a short backup status report.
Smtp Gmail Settings Without Verification
These are the smtp Gmail settings that you can use:
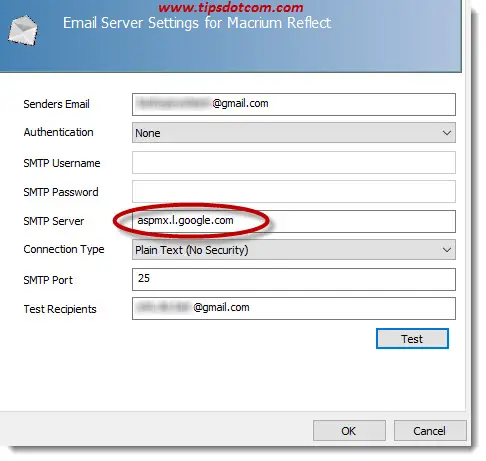
Smtp server: aspmx.l.google.com
Other configuration settings: none
Example of usage: In the image below I’ve set up my Macrium Reflect backup software with smtp Gmail settings so that I receive a backup report in my Google Apps inbox each time a backup has run.

You can also use these settings in your e-mail client, such as Microsoft Outlook or Mozilla Thunderbird but also Windows Mail.
Another frequent example would be setting office scanners to send scanned documents as e-mail attachments to e-mails addresses of office workers. Remember: this will only work if the office workers have Gmail or Google Apps e-mail accounts. To be able to send to *any* email address, you’ll need to set smtp Gmail settings *with* verification. This brings us to ...
Gmail Smtp With Verification And SSL/TLS
While the settings in the example above will work for sending mail to Gmail addresses, you can always use the more reliable option of setting up your configuration *with* verification. That way you’ll always be able to send e-mails to *any* e-mail address. In the example above with Macrium Reflect you have the choice between the two, but if you’re using Gmail’s smtp servers to send e-mails from scanner devices or other hardware or software that doesn’t support secured SSL/TLS connections, you’re limited to the settings in the previous part of this article.
If you have the choice of using verification and secured connections, these are your smtp Gmail settings to use:
Smtp server: smtp.gmail.com
Port 465 (SSL required) OR
Port 587 (TLS required)
Authentication: use your Gmail or Google Apps e-mail address and password for authentication.
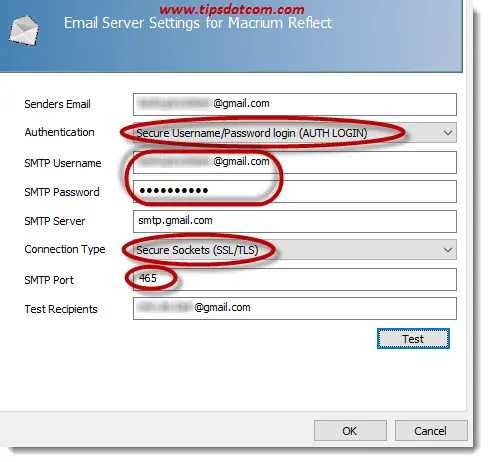
Here’s what this would look like in my Macrium Reflect backup software:

As you can see, here I selected “Secure username/password login” as method of authentication (vs “None” in the previous example) to connect to the smtp server.
As a consequence, Macrium Reflect requires me to enter an smtp username and password in the configuration screen. Here I entered my Google Apps e-mail account and matching password.
In the smtp server field I entered Google’s smtp server (smtp.gmail.com) and I selected a secured (SSL/TLS) connection type to talk to the smtp server.
The smtp port to use is 465, which completes my settings to be able to send mail via Google’s smtp servers.
If you’re setting up an office scanner or other device with secured connection possibilities, you’ll be better of using these settings than the settings in the first part of this article.
Again it should be noted that you can also use these settings in your e-mail client software such as for instance Microsoft Outlook.
Related articles: Setting up a Gmail account - Thunderbird Gmail Settings.
If you've enjoyed this article or found it useful, I'd appreciate it if you'd let me know by clicking the Like (or Share) button below. Thank you!


New! Comments
Have your say about what you just read! Leave me a comment in the box below.