Visualize Disk Usage To Know What’s Really Eating Your Disk Space
I’d like to introduce a tool to visualize disk usage. It may sound trivial to display your hard disk usage in a visual representation, but don’t underestimate the power of a visual overview of your files. Many computer experts use this technique to quickly free up large amounts of hard disk space and optimize personal computers.
A tool to visualize disk space will display your files in a way you haven’t seen before, allowing you to quickly determine which are the files that take up most of your hard disk capacity. I promise you: the results are often surprising.
This method also ties in perfectly with my recent disk cleanup article, as it quickly reveals large and often useless files hiding around in your system. You’re much better off without these lurkers. Getting rid of them will free up important resources on your computer and bring new storage space into your digital life, so you’ll be able to store more of your photos, music or other personal files.
Not convinced that a tool to visualize disk usage will reveal large files on your hard disk that you didn’t know of? You’re not alone. If you’re like me and you are pretty organized when it comes to the contents of your hard drive, you may feel pretty sure that you have a very good idea about what’s living in your file storage.
And I agree. You *know* where you’ve put those large downloads and you *know* where you store your folders that contain the bulk of your files. But trust me, you may *not* know about certain programs, tools or utilities that keep ongoing log files of activity. You also may not be aware of enormous memory dumps or ugly system logs that silently came into existence on your hard drive when one of your programs was heading for a crash or experienced a “not responding” state.
Whenever you see a program on your computer with “not responding” in the title bar, it may very well be that the program is extremely busy writing huge memory dumps or crash reports to your hard disk. And if you do nothing about them, they just remain there, taking up large amounts of your valuable storage capacity while collecting digital dust until the final days of your computer’s life.
So How To Easily Visualize Disk Usage?
You can download free “visualize disk usage software” from the internet. One very fine, quick and super-easy-to-use tool is WinDirStat.
Once you’ve downloaded WinDirStat, go to the downloaded setup file, right-click the file and select “Run as administrator”.

In the User Account Control window that appears, click yes to continue.

Accept the terms in the license agreement and click next to continue.

The default setup options are fine, so click next.

The default destination folder is shown and now you can click install to continue with the installation.

The installation should run very smoothly and usually only takes a few seconds, so you’ll have the “Installation complete” screen in a jiffy.

Leave the “Run WinDirStat” checkbox selected and click close to launch WinDirStat.

The WinDirStat tool to visualize disk usage will greet you with a screen where you can select individual hard drives or you have the option to select a specific folder.

During the scan task to visualize disk usage you’ll get a process indicator screen where you can monitor the progress.

Upon completion, you’ll get a visual representation of the contents of your hard drive, like in the image below.

Note how the size of files is represented by the size of the blocks in the image, so you’ll immediately get a visual of the files that take up the largest amount of storage.
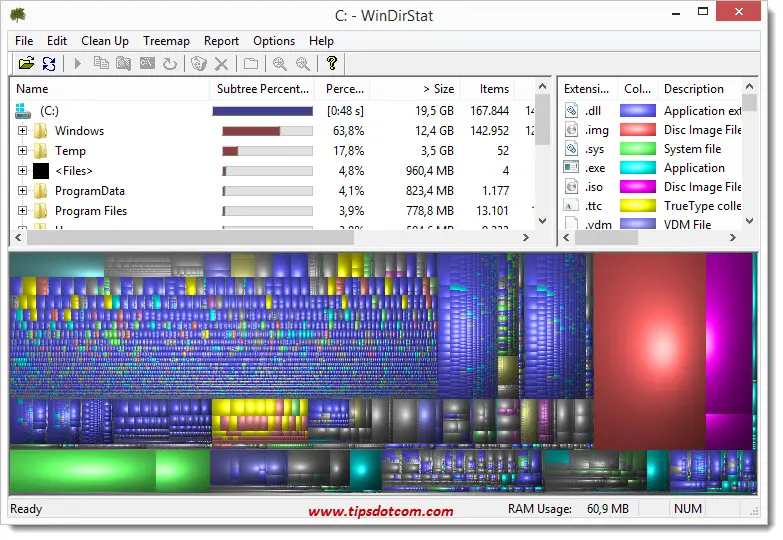
In the image above, you notice the reddish large block on the right-hand side, next to the two purple blocks.
If you want to take a look at the file, simply click the block with your mouse and in the upper part of the screen, the file will become highlighted, so you’ll immediately see the file details.

In the upper part of the screen, you can right-click the file and choose between a number of options in the context menu, including the options to move the file to the recycle bin or immediately wipe the file permanently, without going via the recycle bin.

Of course you should proceed with caution when removing large files. For instance, one of the files that will often show up as a large block when you visualize disk usage is a system pagefile or swapfile, like the ones shown in this image here:

Those are system files that are needed by Windows to function properly, so you must never delete them.
If you see large files with a .log extension however, those are usually log files kept by programs in order to allow support people to diagnose issues with the program when there is a problem. Sometimes these log files keep growing in size during several years and as long as you are not working with the support department of the program to solve an issue, you don’t need to keep the log files.
Other large files you might recognize when you visualize disk usage are of course large files that you still have sitting on your hard drive and that you had completely forgotten about. If you don’t need them anymore, you can of course free up the disk space by wiping them.
I hope this article was helpful in taking a look at your file storage in a different manner. Please take a brief moment and leave a short comment below, I’d appreciate it, thank you!
If you've enjoyed this article or found it useful, I'd appreciate it if you'd let me know by clicking the Like (or Share) button below. Thank you!
Recent Articles
-
Allow my Organization to Manage my Device - Yay or Nay?
Oct 28, 23 11:30 AM
 Ok to allow my organization to manage my device? Here are my recommendations from an IT pro on how to deal with this. Spoiler alert: most get it wrong.
 -
Destination Path Too Long Error When Copying Files - Solved
Jul 10, 22 12:22 PM
 A destination path too long error when copying files or folders is pretty annoying. Now it doesn't have to be with this proven solution.
 -
Change The RDP Listening Port in Windows - Here's How
Jul 04, 22 08:29 AM
 You can change the RDP listening port in Windows via this setting in the registry. Don't forget to make changes in Windows Defender firewall too.
 -
Share OneDrive Files With External Users - Complete Guide
Jul 01, 22 08:39 AM
 Here's how I share OneDrive files with external users, even if they don't have a Microsoft account. Modern file sharing makes it easy.
 -
Windows 11 File History - Automated Backups
Jun 28, 22 09:44 AM
 Using Windows 11 file history to automatically backup your files. Learn about backup frequency, retention period and common mistakes.
 -
Windows 11 Device Manager - Fixing Devices That Don't Work
Jun 25, 22 12:59 PM
 Using Windows 11 device manager to fix problems with faulty devices. Updating device drivers and manually loading drivers to solve problems.
New! Comments
Have your say about what you just read! Leave me a comment in the box below.