How To Backup Windows 7
Everybody should know how to backup Windows 7. To paraphrase Baz Luhrmann in his song Everybody's Free (To Wear Sunscreen): if I could offer you only one tip for the future, backup would be it.
Have you already backed up your computer today? Have you ever wondered why it is that so many people don’t even *know* whether or not their data is secured by a backup copy?
I don’t want to pretend that I understand all the reasons why a decent backup strategy is missing on so many computers, but I do know this: hard disks can break and computers do crash. And it can happen in the blink of an eye.
You would be surprised how many computers die after the simple event of a short power outage. Also, the life span of hard disks is finite and when they die they tend to do so without warning. And then there’s the operating system. Operating systems sometimes go belly up by one single click on a bad link in a malicious message or a fraudulent website, preventing your computer to start up.
I’m not saying this to worry you. On the contrary, if you do have a solid backup plan, you don’t need to worry that something goes wrong. So let me first show you how to backup Windows 7 efficiently and gracefully.
How To Backup Windows 7
One of the first things to decide when creating a backup of your computer is *where* to put the backup copy. You’re going to be making a backup copy of all the data on your hard drive and this copy needs to go somewhere.
An external hard drive works best because it’s fast, it’s easy and they offer plenty of space. If you need to pick up an external hard drive, you can look for one such as this model on Amazon.
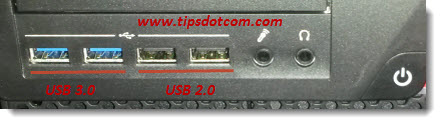
Look for an external hard drive that supports USB 3.0. That’s a lot faster than USB 2.0 and it will work with your computer, even if your computer only supports USB 2.0. If you’re not sure whether or not your computer has USB 3.0 ports, take a look at the color. USB 3.0 ports are blue. To illustrate this, take a look at the image below where you can clearly see how the 2 USB ports on the left are blue, which indicate that they are USB 3.0, whereas the 2 ports on the right are black, meaning they are USB 2.0.
As soon as you’ve hooked up a suitable external hard drive on your computer, you’re ready to start creating your backup plan.
To get started, press the Windows-key + e on your keyboard to open up Windows Explorer.

Your Windows Explorer window might look slightly different from the image right below here, but you should also see a drive letter where your Windows operating system is installed (usually c:) and a drive letter representing your external hard drive (in this example my external hard drive letter is e:)

The drive letter containing your Windows operating system is the one you want to backup, so right-click on the drive and select “Properties”.

That will open up the drive properties window, where you will see a graphical representation of used and available disk space.

In the drive properties window, click the “Tools” tab to continue to this next screen:

In the tools tab, click the “Backup now” button to proceed onto the backup and restore screen:

Now, in the backup and restore screen, click the “Set up backup” link in order to go to the screen where you define how to backup Windows 7.
Windows will prompt you to have a little patience while Windows backup starts.

This shouldn’t take long and after a few moments you will be presented with the first Windows backup configuration screen. As you can see in the image below, Windows successfully detected my external hard drive and automatically suggests this drive as recommended backup destination.

Select your external hard drive as backup destination and click next to continue.
In the next screen, Windows will offer you the option to let Windows choose what to backup or decide for yourself. For this example, I’ll select the option “Let me choose” because that gives me a little more control. Furthermore, if you select “Let Windows choose”, only local files in libraries are included in the backup. That means that files that you have saved in different folders on your hard drive are *not* included in the backup, which is why I always prefer to make my own selection.

In the next screen, you can select which files and options you want to include in your Windows 7 backup.

As you can see in the image above, the option to backup your entire drive c: is *not* checked by default. Make sure to check this option before proceeding to the next screen. The option to include a system image, on the other hand, is checked by default. Leave that option checked as it will include the necessary files to restore your computer in the event of a system crash.
The next screen will show a last overview of your backup settings, as well as an option that allows you to define how to backup Windows 7 with an automated schedule.

Click the “Change schedule” link if you want to define your backup schedule.

One you have decided upon a monthly, weekly or daily schedule and the corresponding timing settings, click ok to return to your backup overview settings.
When defining an automated schedule for your backups, please keep in mind that your external hard drive must be connected to your computer during the times when your backup is scheduled to run, or your backup won’t be able to run. Also, the computer must be powered-on for the backup to run.
The notification that “A system repair disk might be required to restore a system image” refers to the disk that will be required to restore your computer in the event of a complete computer crash. If your Windows operating system gets so severely damaged that your computer won’t start from your hard disk, or when your hard disk fails and prevents your computer to start properly, you will need a separate system repair disk in order to boot your computer. I’ll come back to this right away.
For now, let’s just move on and click the “Save settings and run backup” button and proceed with the backup.
Windows will show you an overview screen with the actual backup progress indication.

If you’re wondering how to backup Windows 7 with a system repair disk, take a closer look at the above progress screen.
Note the link that says “Create a system repair disk”. That’s the link you can click in order to create that system repair disk to boot your computer in the event of a crash. Feel free to click the link, even when your backup is still running.
Windows will prompt you to select your CD / DVD drive and insert an empty disk in order to create your system repair disk.

Windows will show another progress indicator screen, this time to inform you about the progress of the system repair disk.

This shouldn’t take too long and after a little while you will be informed that the disk is ready.

It’s a good idea to do as suggested, label the disk appropriately and put it away in a safe location where you will be able to find it in the event of a computer crash.
Thank you for visiting my page on how to backup Windows 7. Please take a brief moment and leave a short comment in the section below, I’d appreciate it!
If you've enjoyed this article or found it useful, I'd appreciate it if you'd let me know by clicking the Like (or Share) button below. Thank you!
Recent Articles
-
Allow my Organization to Manage my Device - Yay or Nay?
Oct 28, 23 11:30 AM
 Ok to allow my organization to manage my device? Here are my recommendations from an IT pro on how to deal with this. Spoiler alert: most get it wrong.
 -
Destination Path Too Long Error When Copying Files - Solved
Jul 10, 22 12:22 PM
 A destination path too long error when copying files or folders is pretty annoying. Now it doesn't have to be with this proven solution.
 -
Change The RDP Listening Port in Windows - Here's How
Jul 04, 22 08:29 AM
 You can change the RDP listening port in Windows via this setting in the registry. Don't forget to make changes in Windows Defender firewall too.
 -
Share OneDrive Files With External Users - Complete Guide
Jul 01, 22 08:39 AM
 Here's how I share OneDrive files with external users, even if they don't have a Microsoft account. Modern file sharing makes it easy.
 -
Windows 11 File History - Automated Backups
Jun 28, 22 09:44 AM
 Using Windows 11 file history to automatically backup your files. Learn about backup frequency, retention period and common mistakes.
 -
Windows 11 Device Manager - Fixing Devices That Don't Work
Jun 25, 22 12:59 PM
 Using Windows 11 device manager to fix problems with faulty devices. Updating device drivers and manually loading drivers to solve problems.
New! Comments
Have your say about what you just read! Leave me a comment in the box below.