Let’s Finish Setting up Your Device
Your computer welcomes you with a “Let’s finish setting up your device” blue screen? It also says that “Your device needs to connect to a few more Microsoft services to help you work more easily and securely across all your devices”. This can happen after your computer had Windows updates installed and it’s a legitimate Windows screen, so you don’t need to worry that you’ve been attacked by some virus.
The screen will look like this

Things like “Windows Hello”, linking your phone, Microsoft 365 and Onedrive cloud storage are presented to you.
In this article I’m going to cover what this means and how you can proceed.
One word of caution though: if for some reason you are in a hurry and you are caught by surprise by the “Let’s finish setting up your device” screen, I strongly recommend clicking the “Remind me later” link in the bottom left corner of the screen.

If you click “Remind me later”, you’ll be able to move forward using your computer as you always did, without having to go through additional configuration steps if you are stressed for time. And yes, you can always return to setting up these extra services later on, when you have more time (more on this further on down below). If you click “Remind me later”, the “Let’s finish setting up your device” screen will go away and you’ll be able to use your computer normally.
To be honest, the “Let’s finish setting up your device” is not much more than Microsoft’s attempt to urge you into using a Microsoft account and sell you paid subscriptions to services like cloud storage and Microsoft 365. I’m not saying that using a Microsoft account is bad, but you can get the benefits of a Microsoft account without necessarily having to get a paid subscription to services. That’s why I will show you how to decline some of the proposed suggestions in the screens that will follow if you do choose to continue with the “Let’s finish setting up your device” screen.
With that out of the way, let’s take a look at this.
Getting Past The Blue “Let’s finish Setting up Your Device” Screen
Click the continue button at the bottom right corner of the screen.

The next screen that you’ll see is where you can either sign in with a Microsoft account or create a Microsoft account if you don’t already have one.

Sign in with your Microsoft account by entering your email, phone or Skype and clicking next (if you don’t have a Microsoft account, you can create one by clicking “Create account” right below the field where you can enter your email, phone or Skype - You can also find more information about creating a Microsoft account here).
In the next screen, enter your Microsoft account password and click next.

You’ll now see a screen where you can link your smartphone to your Windows pc. You can do this by entering your phone number and clicking next, or you can skip this (click the “Do it later” link in the bottom left corner of the screen if you want to skip this step for now).

If you do enter your mobile phone number, you’ll receive a text message with a link on your smartphone. You can then click the link in the message on your smartphone to install an app to link your smartphone to your Windows pc. Why could this be useful? For example, if you ever forget your Windows password, Microsoft services can contact you via your phone to unlock your account.
In the next screen you’ll see “Backup your files with Onedrive”, which means you can start using the cloud storage that’s included in your Microsoft account. Be careful with this option though, as you will only be able to use up to 5GB of storage for free. For any storage beyond 5GB, you must upgrade your account to a paid plan. In this screen you can click the “Only save files to this pc” link in the bottom left corner of the screen.

By doing that, you avoid that every file you save will automatically be saved in your Onedrive cloud storage and you’ll avoid the 5GB storage limit.
The next screen is another attempt by Microsoft to lure you in into getting a paid subscription to software services that might not necessarily be the best option for you. It’s a free Microsoft 365 trial. Admittedly, if you sign up for the free trial and decide to switch to a paying subscription when the trial is over, you do get 1TB of Onedrive cloud storage with that, which solves the 5GB storage limit from above. On the other hand, with a paid subscription you end up paying month after month after month for something that you might be able to solve differently (with a one-time purchase or even with free open source software).

For more information about your best software choices, getting Microsoft 365 or other options, see my article about what software to install on a new computer.
For now, let’s click the “No thanks” button in the Microsoft 365 trial screen and wrap up what we were doing (Let’s finish setting up your device).
Now you should see a screen that you are ready to start using your computer.

Let’s Finish Setting up Your Device - Later on
Earlier on I mentioned that you can always skip the blue screen with the “Let’s finish setting up your device” message if you are stressed for time and that you can come back to it later, when you have time.
As you may have understood by reading this article, what this “Let’s finish setting up your device” comes down to is Microsoft trying to convince you to start using a Microsoft account.
When you come to the point where you decide that you do want to give some time and attention to this possibility, you can read how to create a Microsoft account here. By doing that, you will not get the exact same blue screen with the message “Let’s finish setting up your device”, but as you may have noticed by reading all the above, the first thing you see when you click “continue” in that screen is a window where you sign on with your Microsoft account (or create one). It really comes down to linking your device with your Microsoft account. So if you create a Microsoft account and link your device with it, you’re good.
If, on the other hand, you want to avoid seeing another blue “Let’s finish setting up your device” screen after future Windows updates, you can always disable this notification. To do so, click the Windows start button in the bottom left corner of your screen and select settings.

Then, in the Windows settings window, click system.

Then click “Notifications & actions”.

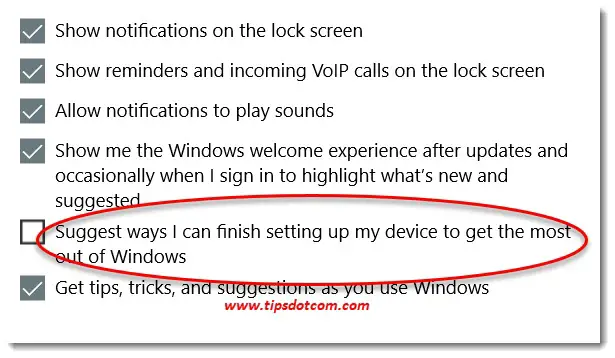
Now make sure to deselect the checkbox next to “Suggest ways I can finish setting up my device to get the most out of Windows”.
That’s it, now you will no longer get this type of notification when Windows updates have been installed on your computer. As mentioned, you can always start using a Microsoft account at a time when you are ready to explore one.
If you've enjoyed this article or found it useful, I'd appreciate it if you'd let me know by clicking the Like (or Share) button below. Thank you!
Recent Articles
-
Allow my Organization to Manage my Device - Yay or Nay?
Oct 28, 23 11:30 AM
 Ok to allow my organization to manage my device? Here are my recommendations from an IT pro on how to deal with this. Spoiler alert: most get it wrong.
 -
Destination Path Too Long Error When Copying Files - Solved
Jul 10, 22 12:22 PM
 A destination path too long error when copying files or folders is pretty annoying. Now it doesn't have to be with this proven solution.
 -
Change The RDP Listening Port in Windows - Here's How
Jul 04, 22 08:29 AM
 You can change the RDP listening port in Windows via this setting in the registry. Don't forget to make changes in Windows Defender firewall too.
 -
Share OneDrive Files With External Users - Complete Guide
Jul 01, 22 08:39 AM
 Here's how I share OneDrive files with external users, even if they don't have a Microsoft account. Modern file sharing makes it easy.
 -
Windows 11 File History - Automated Backups
Jun 28, 22 09:44 AM
 Using Windows 11 file history to automatically backup your files. Learn about backup frequency, retention period and common mistakes.
 -
Windows 11 Device Manager - Fixing Devices That Don't Work
Jun 25, 22 12:59 PM
 Using Windows 11 device manager to fix problems with faulty devices. Updating device drivers and manually loading drivers to solve problems.
New! Comments
Have your say about what you just read! Leave me a comment in the box below.